Shop Duck Duck Wool

Where was that?
Updates

Enter your email address:

Delivered by FeedBurner

Look around
Pumpkins One, Two, and Three (and Me)

when I started the blog...

and a few years in...

and now...

3pumpkinslittle on Instagram 


Entries in crafts (117)

Monday
Oct262009

If you wait until the last minute, it only takes a minute.


Back when I was practicing appellate law, a dear co-worker and I adopted the title of this post as an unofficial office slogan.  We were so busy that on any given day, we could only deal with the most urgent of deadlines.  I find myself in a similar boat these days.

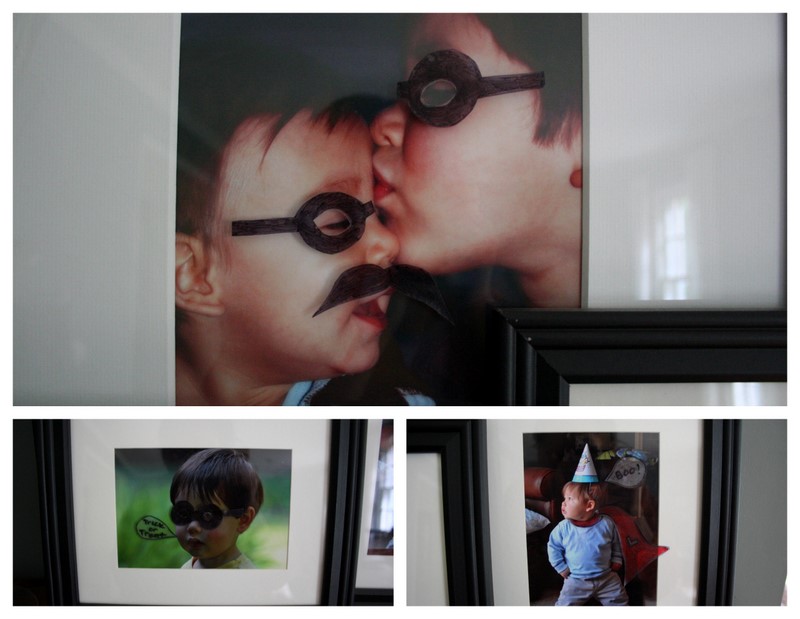
Last year, Max was sick the entire week before Halloween.  It turned out to be bronchitis.  It was almost serious enough to keep him in for trick or treating, but luckily, he started feeling better and made it out.  I am 85% sure he was not faking it. 

He asked to be a wizard and I had every intention of finding a pattern and sewing a proper costume for him.  But caring for him that week was full-time, especially as we were constantly on guard, attempting to keep his brothers healthy (but of course Leo still got sick).

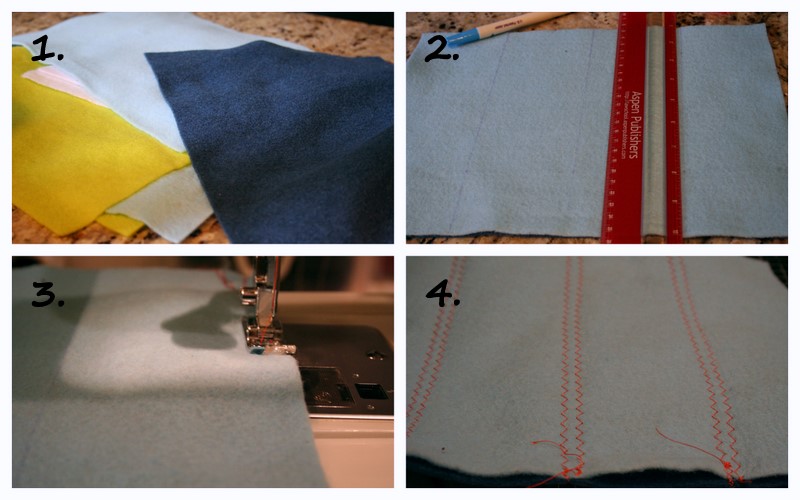
It was not until the night before Halloween that I found time to try to whip up a wizard costume (and no, the irony that I had to conjure up something was not lost on me).  I already had the fabric but no pattern.  Below is what I did and it worked well enough.  It is certainly not the best constructed garment I've ever made--in fact, it's probably one of the worst--but it was quick and easy and put a smile on my little one's face, a rare sight indeed that week.

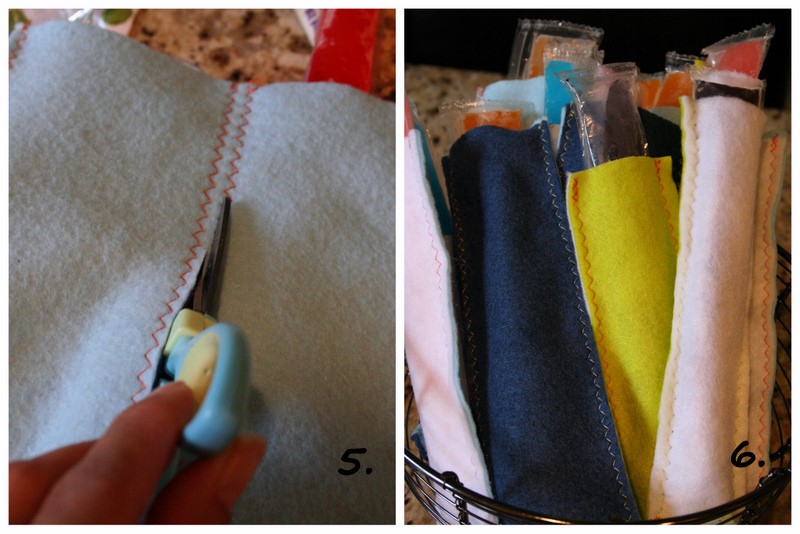
In case you are in similar desperate straits (and I sure hope you're not), here is an extremely rudimentary guide to how I made a wizard frock in about 30 minutes.  Ours went over the head but you could also cut it up the front to make it more robe like.


I used a satin costuming fabric that was fairly difficult to work with, especially the neckline as it kept slipping (I double folded it).  To really save time, I recommend using a fabric that will not fray, such as fleece or jersey, so you wouldn't have to bother with hemming. 

As for Leo, he had told us for weeks that he wanted to be an astronaut and the plan was to use Max's costume from the previous year.  But the night before the harvest parade at his school, he decided he wanted to be a lion.  He really wanted to be a lion.

And I have a problem saying no. 

Again, I attempted this with no pattern--what is wrong with me??  I used a pair of his footed pajamas as a guide.  I'm sorry I can't diagram it because it was pretty nightmarish and I've blocked it from memory.  At least the parade was a few days before Halloween, so in my book, I was done "early."   I used fleece, which I love because it is so forgiving.

So after last year's stressfest getting their costumes done, you would think I learned my lesson and finished their costumes early this year, right?  Perhaps before we left for Disney?  Wrong.  Guess what I'll be doing after bedtime this week? 

I'm participating in A Soft Place to Land's DIY day.  Be sure to check out all the other projects--I always get so many ideas from there!


Thursday
Oct152009

Applesauce jack o'lantern favor tutorial.

Our youngest started in a nursery class this year and his group plans to have a small Halloween party, so I needed another non-candy favor idea.  It's not as if Will hasn't tried candy--please, he's the third--but at least I can say it's on a rare occasion.  The older boys know to go into stealth mode (hide in pantry) when they're eating a piece.

I came up with applesauce jack o'lanterns and if you'd like to make some, too, you will need:

  • 2 applesauce cups (per favor)
  • tape
  • scissors
  • orange crepe paper
  • black electrical tape

Directions

Tape applesauce cups together to form pumpkin shape.

Wrap crepe paper around a few times, just to help with coverage.  Tape.

Fold crepe paper in half (better coverage, better scale) and wind around and around, turning as you go, until the cups are completely wrapped.  Tape.

Cut cute (we went for non-scary) jack o'lantern face shapes out of electrical tape.  Stick on.  Tie on a note if you like.  Get these done ahead of time and cross something off your to-do list.


Tuesday
Oct132009

Mummy flashlight tutorial.

I've had this idea since last year when we saw inexpensive flashlights at Ikea (I think they were 50 cents).  My boys love flashlights, especially when they are trick or treating.  So instead of giving out candy favors at our Halloween celebration, I thought we'd give out flashlights.  I of course also wanted them to look cute--so like everything else around here during Halloween, they got the mummy treatment (we're talking stuffed animals, furniture legs, me if I stand still long enough...).

You will need a small, inexpensive flashlight, white crepe paper, tape, and a black marker.  I haven't made it back to Ikea to see if they have the bargain flashlights again this year, but I found this one at our Dollar Tree (I also picked up some batteries there.  I definitely recommend having the flashlights ready to go to avoid the buzz kill factor).  

Wrap the flashlight a couple of times with the crepe paper lengthways and tape to secure.

 Fold the crepe paper in half and wrap the flashlight completely.         

After securely taping, dot on a couple of eyes with a marker (I think googley eyes would be great here but I didn't have any on hand).  Add a note and there you go--a practical, yet fun, Halloween favor that both kids and parents will appreciate. 

For more DIY ideas, be sure to check out today's DIY Day at Kimba's A Soft Place to Land.  And also be sure to check back here for another sugarless Halloween favor idea.  It's geared to the under-two set and I hope to post it tomorrow. 

Wednesday
Oct072009

Halloween treat bag tutorial.

I was in the craft store a few days ago and saw a kit from Martha's line for cute favor bags.  They were designed to look like witch brooms and I thought they were adorable.  But I didn't want to spend any money on them since I knew I could do the same thing with items I already had at home.

Here's what you will need (per treat bag) if you'd like to make some, too:

  • 2 brown paper bags
  • straight edge
  • exacto knife and cutting surface
  • twine
  • twig*

Directions:  

Flatten one of the bags.  The picture below isn't the best because I didn't take one with the sides smoothed out.  Basically, you want two layers to cut through so push out the sides and flatten.

Leaving about a two inch border of the bag uncut at the top and bottom, cut lines through both layers in the center portion.  No need to be too exact, it's a witch's broom after all. 

Place your goodies in the uncut bag and place within the cut bag. 

Shmoosh down a bit and gather both bags at the top.  Insert your twig* and tie with twine. 

I think these will be perfect to package our Halloween cutout cookies this year.  I'll use the sugar cookie recipe and frosting technique I posted about here.
*If I were making these for children, I'd probably use a pretzel rod in lieu of a twig (maybe a cellophane wrapped chocolate-dipped pretzel rod, hmm...).  Generally speaking, I'm against equipping children with a pointy, small, stick.  Especially when they're in a group.  And sugar is in their near future.  I'm just saying...
Monday
Oct052009

Ma'am. Step away from the contact paper.


Could someone please, please, come over here and put away this roll of vinyl?  I really do have some other stuff to get to.  But I couldn't help myself yesterday when I started decorating for Halloween and decided that our pictures looked a little out of place.

So I held up a sheet of acetate over the pictures to get a sense of scale.  And I drew a mustache here, a cape there...a few masks.  Then I traced everything onto contact paper (excuse the drawings--18 month-old on lap while attempting). 

I topped them with another sheet of vinyl and did some trimming and some sticking (more on Con-Tact paper crafts here and here).  Now the pictures are ready for Halloween.  

I saw a clever post last year where you use a grease pencil to embellish your pictures.  That was my original plan.  But then I realized that drawing directly onto my picture glass would absolutely guarantee a 30 minute Windex frenzy right before guests arrived for Thanksgiving dinner.  So this works for me--after Halloween, I can just peel off the cut outs.

More Halloween stuff coming up--Happy Monday!

Friday
Oct022009

On a roll.

ETA:  Hiya.  For some reason a picture that's not meant to appear in this post is appearing in lieu of the intended photo (see the flowers down there?  And if you don't see flowers maybe it's resolved).  I've tried to fix it but that just results in another picture swapping in another post.  So I'm sending a Q to the super helpful folks at Squarespace tech support.  Hopefully they can help--pls pardon it in the meantime (I want to leave up the misplaced photo so they can see what I'm talking about).  xo, S


We're not quite finished making reading labels, so the Con-Tact paper roll is still out.  And it's a good thing because an impromptu neighborhood playgroup had to duck inside due to a sudden rain shower.  So I let them loose on the materials for a quick craft project.  We made vinyl stickers--here's how: 

 Have the little ones draw on the contact paper, leaving the backing on (I like to tape it down because it curls up when it comes off the roll).  We tried to use normal markers but they wiped right off.  Instead, use permanent markers (note to self:  get more colors!) or crayons.  Top with another sheet of contact paper and cut out.  Little hands will need help peeling the backing off as it can be a bit fussy.  And on the crayon drawings, the top layer will not want to adhere to the waxy image without some extra rubbing.

These work great on windows.  And they hold up much better to the abuse a one-year-old can dish out (at least compared to the gel stick-ons we've previously used). 

I think we'll do a whole bunch of Halloween decorations next.  (ETA:  Did some, see this post).  Have a great weekend!

Monday
Sep282009

Twine and vase.


I like twine.  I like its nubbiness, its texture.  Especially in the fall.  And especially when I find skeins of it in Target's $1 bin area.  I also found this cute vase set for a dollar there, last spring I think.  I love their shape.


I also liked what they said.  But the crooked lettering?  Not so much.  So I let Leo partially cover them with twine.  I had to help straighten up the rows when he was done.  And I handled the glue.  But the end result are some cute, fall-esque vases perfect for displaying the pretty leaves he collects on our walks.  He is fascinated with leaves and always finds some brilliantly colored ones. 

I also took some twine and covered an empty soup can. 

It'll go with Max to school tomorrow, packed with a few brownies, to thank a lovely friend for taking him, along with her daughter, to the National Book Festival on the National Mall.  He had a ball.  And remember how I told you he has a thing for Clifford?  She waited with him despite the long line and snapped this shot.  Max asked me to print it out "big, mommy, I want it big" and place it in a frame for his bedroom.  I think I owe her much more than brownies.

Monday
Sep212009

Craft along give away, no. 1.

As I mentioned in my initial post, one of the reasons I started this blog was to try to motivate myself to take on more of the wonderful tutorials out there and actually produce things.  But mostly, I'm still just staring.  I blame two of my personality traits for getting in the way.  One, my economies of scale mentality and two, I am as fickle as they come about crafts.  Let me explain.

When I see a project that I'd like to do, chances are it's something new to me.  And so, although my stash of craft supplies and unfinished objects is piled impossibly high, it sometimes falls short of an essential supply item.  Enter trouble--because when I research sourcing this latest must-have item, I usually find that I can get, let's say, 5 keychain fob hardware sets for $6.  BUT...and please tell me that you know what I'm going to say because you've been there too...I can get something crazy like 50 sets for $20. 

Do I need 50 sets?  Um, no.  Will I be enchanted with the project long enough to ever make 50 sets?  Well, pigs could fly I suppose.  And don't even get me started with my "oh, maybe someday I'll put some in my Etsy shop" rationale because I've tried that, too, and that little shop has sat empty since the birth of pumpkin little no. 3.  But just as certain as I am to check on the boys before I can fall asleep--recklessly risking waking them up by leaning in so close to their quiet little faces to hear them breath so that I know they are fine, just fine--I will buy the "better" deal or none at all.

This is where you are going to come in, so stay with me, okay?

There is nothing more motivating than having a partner to get you going.  So, on a regular basis (tbd--just thinking out loud here), I will pick a tutorial that I'd like to try and will gather the necessary supplies.  And since it's usually just as easy to gather up several sets of whatever key supplies I need handy as it is to do one, I'm going to give one (or more) away for a craft along!  And also--occasionally--I hope to do a co-op of sorts to make things a bit more economical when I cannot resist my supersizing ways (offering up shares of supplies to defray costs if anyone else is interested). 

For our first foray into this experiment, I give you The Small Object's and Chica and Joe's tutorials on how to make your own custom notepad.  Are these on your to-try list but you still haven't?  Perfect!  No padding compound you say?  No worries--I have some and I'd love to share.  I will give away three 2 oz. bottles of the compound (enough for many, many pads, you'll see) to three readers.  No co-op this time.  Baby steps.

To enter, please leave a comment by Friday, September 25, 2009, midnight, EST.  I will pick three random entries and post on Saturday and mail asap.  My blog is pretty new and comment light, so you should have a good shot if you enter. 

Above are the 'mom's got a latte do today' notepads I made, courtesy of the freebie download at Skip to my Lou.  I love them!

Wednesday
Sep162009

Book racks.


There are many, many reasons why I love my husband.  But in the top 5, definitely, is his handiness.  We have a great system:

I dog-ear a page in the Pottery Barn Kids catalog and casually show it to him saying, "I'm thinking about getting one of these book racks for the kitchen and each of the boys.  They're only $119.  Plus shipping."  Charlie:  "I can make all of those for under $60."  Me:  "no way, really?"  Then he's off to Home Depot and out in the garage sawing/drilling/hammering away.  And poof!  Book racks for me to paint and place wherever I like.  Tell me that's not top 5 material.

We've given these away as gifts to many friends and they are always well received.  Kids like to see the covers of their books.  We (and when I say "we" I really mean "Charlie") have some more in line to make and give.  I think I'll actually pay attention to how he constructs them this time and put together a tutorial so you can make some, too.  Believe me, you cannot have too many. 

As depicted above, we have one:  in the odd kitchen-wall space behind the basement door that is only 5 inches deep (yet can hold several cookbooks); over each of the older boy's bed; and in the book nook corner (that is never, ever used for reading books) in the basement playroom.

Tutorial asap, promise. 

Tuesday
Sep082009

Icee cozie with a short how-to.


Although I bake treats nearly every day for my brood, do you know what works them into a tizzy without fail?  Icee pops.  Yes, the artificial flavored water you can always find at the dollar store.  I like to think it's because I don't let the boys eat them too often.  But honestly, it's probably because I went a little heavy on the flax in the most recent round of muffins.

So.  They love icee pops but won't hold them because they are ICE and thus--yup--freezing.  Sick of paper towels constantly unwrapping (not to mention the waste because I finally switched the household to cloth napkins) I whipped up some cozies out of craft felt.  I made a dozen or so for our neighborhood Labor Day block party.  But then it started raining and the entire party moved indoors (as in our indoors) so I put the kibosh on the icee pops. 

I meant to make these all season but never got to it.  And I just should have done it because the cozies took all of 12 minutes to make.  Since summer is technically over (sniff), instead of looking at this as something I never got to, I'm going to spin it as "wow, I already crossed something off my summer craft list for next year." 

 1.  Find some spare felt.  I have a ton of acrylic felt laying around because I'm hooked on using wool felt for most of our crafts.

2.  Determine how wide to make the cozies.  There are wide and skinny icees--go figure.  We have somehow acquired both so I marked accordingly.  You certainly could just wing this but I knew I'd forget to make different widths.  I swear my short-term memory has still not recovered from my pregnancies.

3.  Sew.  I used a bright colored thread in a wide zig zag for contrast.  That is as fancy as I got.

4.  You need two rows of stitches on the inside lines because you will cut between them (see below).  

5.  Cut your cozies apart.  Up to you whether to stitch the bottoms closed (I did).

6.  Put the icees into the cozies...now they are ready for little fingers.