Shop Duck Duck Wool

Where was that?
Updates

Enter your email address:

Delivered by FeedBurner

Look around
Pumpkins One, Two, and Three (and Me)

when I started the blog...

and a few years in...

and now...

3pumpkinslittle on Instagram 


Entries in keeping home (8)

Tuesday
Apr302019

Moving right along. (Sort of.)

I have officially found my tipping point. I've actually always wondered what that might be...you know, that point in your life where the plate of stuff you're balancing just gets out of whack on one spot. It gets a little too heavy, and so the plate tips. And that pesky thing you thought you could handle slides off, and takes everything else crashing down with it. (Okay, maybe that's not the origin of the phrase "tipping point" but it's how I think of it.)

So for the record, my tipping point came when trying to handle these tasks: prepping House 1 to move out of, prepping House 2 to move into, securing a renter for House 1, only to lose the renter unexpectedly (due to a health issue so we worked with her to release her from the lease!), snow storms causing no full weeks of schools for, I don't know, EVER?, new sports seasons (team momming, because of course), PTO President work, dyeing for a springtime yarn show, dyeing for a HUGE wholesale order, traveling husband, and just in general keeping the boys fed and clothed and modestly happy...oh. And a basement flood in House 1, requiring extensive remedial work, then finding new renters.

But here's the thing about one's tipping point. I think you can actually just stay down there, settling in with all the broken bits--because heck, you're broken, too--and throw one killer pity party (which I'm not going to lie--I totally did for more than a hot second). Or you can look around, pick up what can be salvaged, and just get back to the work of getting it done.

Spoiler Alert: It's taken me some time but I've chosen option 2. And although I might at some point revisit the last couple of months to document some things, for now, I am moving right along.

One of the things we are trying to do in this new house is to stop waiting. Stop waiting for the house to be "company ready" before hosting parties. Stop waiting for the boxes to be cleared out before getting started on some projects. The energy we get from a little DIY hit motivates us and reminds us why we signed up for the absolute headache of moving houses after 14 years in one spot. This house has so much potential, and sprucing it up during the unpacking, instead of waiting for us to unpack, sort, and purge through it all, needs to happen, lest we choose tipping point Option 1 mentioned above.

Here's how I envision our "stop waiting" mantra in action. I will tackle each space as having several levels of design needs/actions. So in general I've identified these levels as follows: 1) get settled and use the space, learning pros/cons; 2) make modest/frugal/flexible stylistic changes to make it functional and more aesthetically pleasing "for now"; 3) make longer term renovations and investments in changing out decor/furnishings/finishes (looking at you, kitchen backsplash with dragonflies everywhere). Hopefully, I'll capture it all on here. Because again...the potential of this house is absolutely amazing and thrilling to us.

First up? Our dining room. We had dear friends back in town recently and we wanted to host a group of close-knit neighbors for a sit down dinner. The dining party totaled 13 adults and one of the reasons we bought this house was because of the dining room size...I wanted to be sure to that our first diner party was indeed in the dining room!

We lived in the house and used the space for a few months to confirm that we wanted to keep the dining room where it currently resides--off the kitchen. There was some initial thought that we'd swap it with the living room. But we dreamed that having a large dining room in the middle of the house might actually foster more gathering. A real family table hub used every day, not just a handful of times on special occasions. And I'm happy to report that after living here a few months, the dining room has absolutely become the heart of the house.

The changes we've made so far include swapping out the chandelier and adding a new area rug (our prior dining room rug is too small because our table now lives fully extended given the size of the room). I still need to settle on paint color. And I'm not 100% sure on the shelving styling. Never did I think I could have too much display space, given my collection of dishes and serviceware. But all of these open shelves took me a bit of time to figure out. And it's still ongoing.

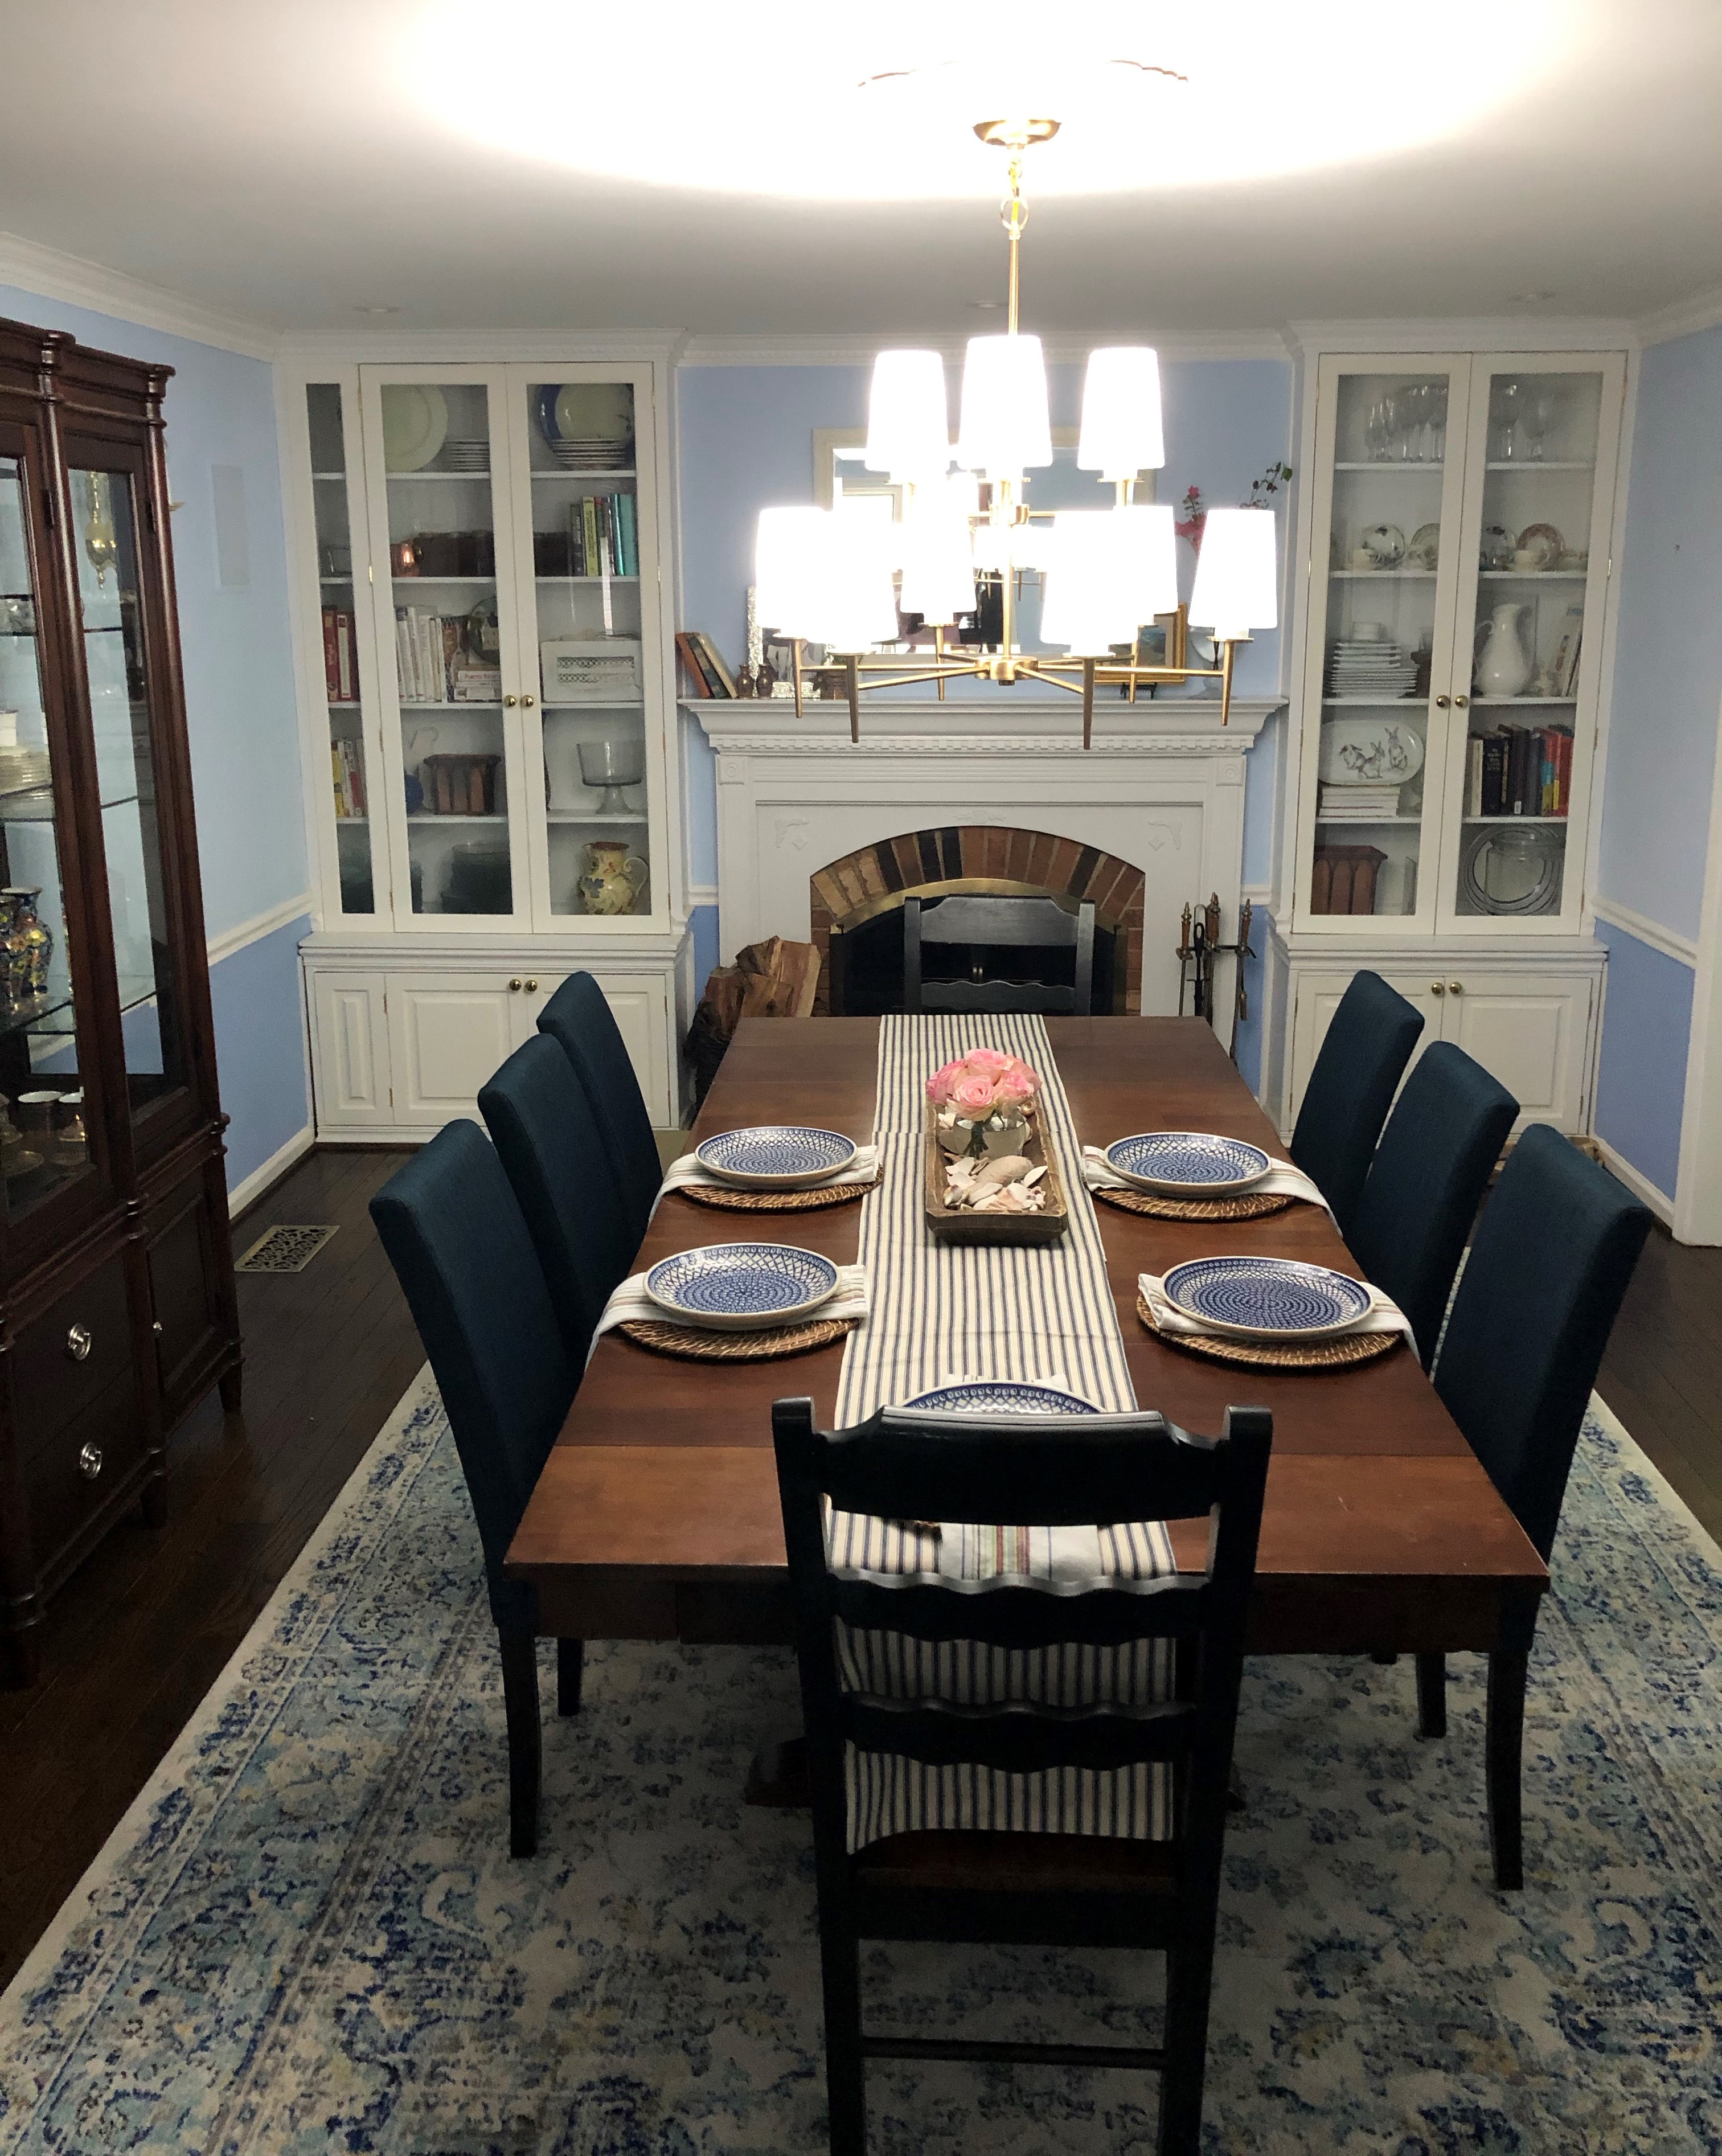
I am trying to keep the table set for family dinners. It helps remind us that we are gathering together in the evening. And I find it also helps keep the clutter from accumulating on such a temptingly large, flat surface! Also, can we just admire the chandelier of my dreams for a minute? It took some time to hang but I could not possibly love it more. We wil swap in matching sconces when the budget allows (this chandy was scored during Wayfair Day. I was so excited to see it on sale!)

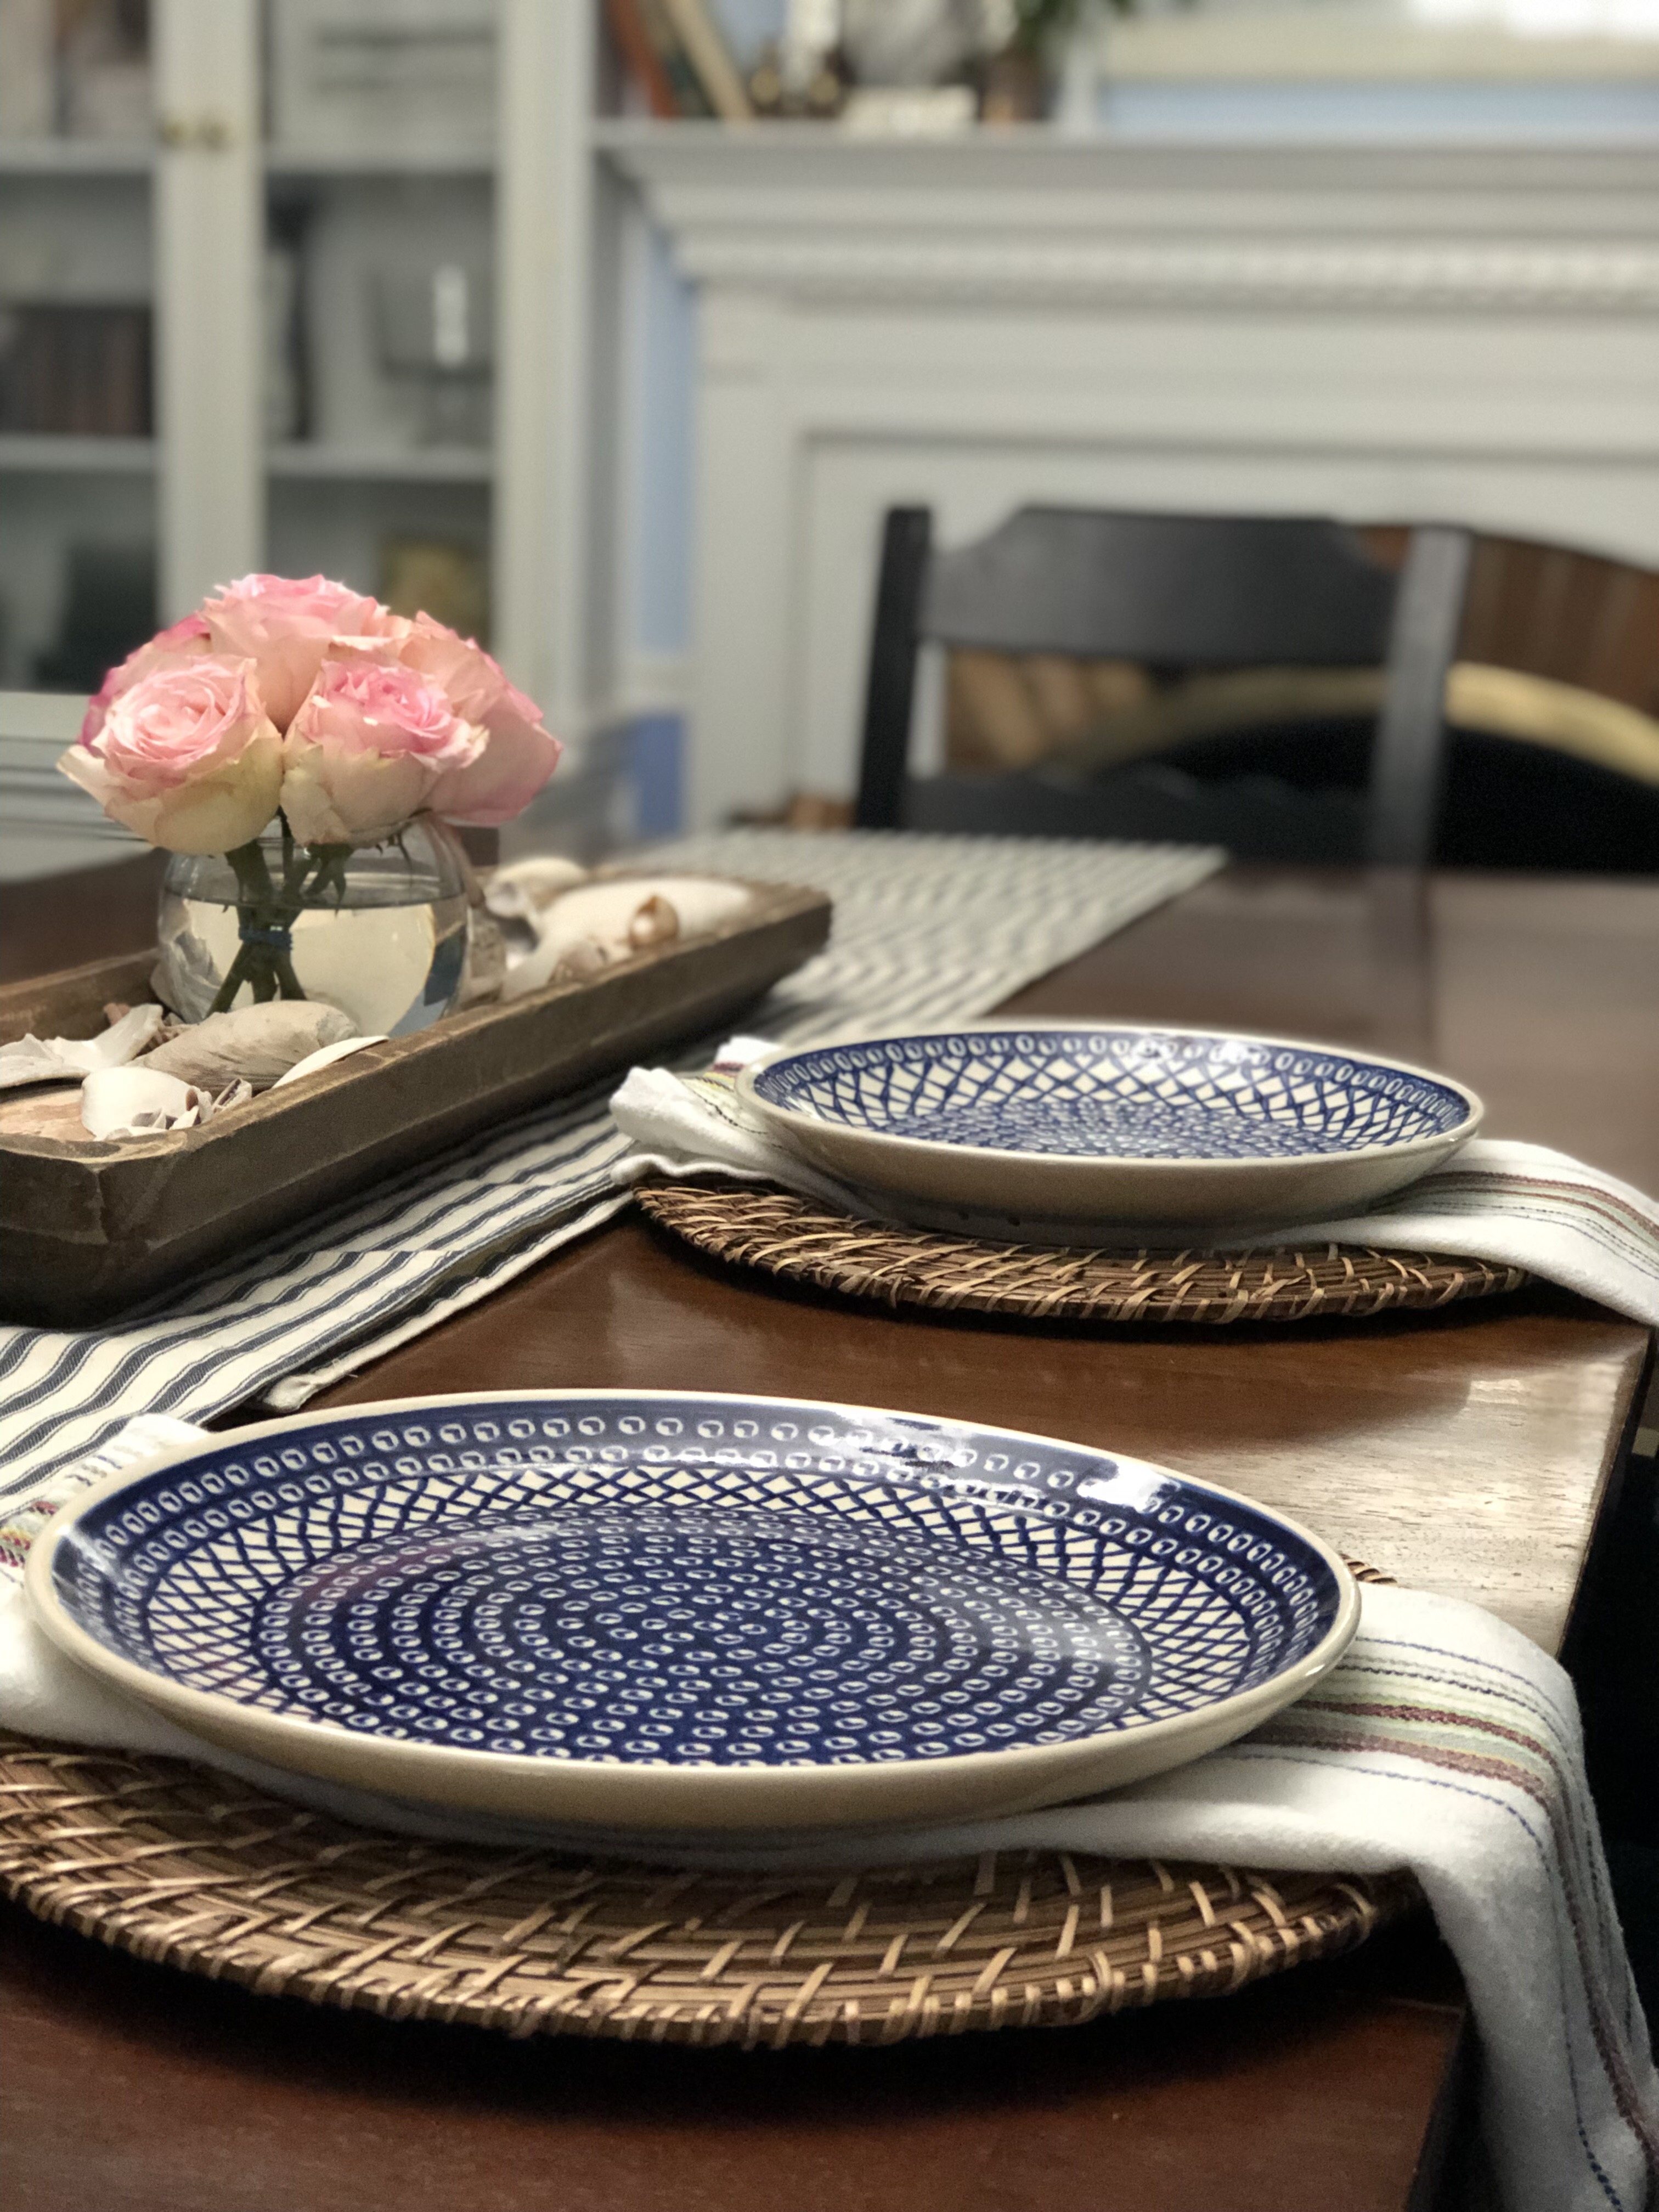
One of the colors I am repeating throughout the house is navy blue. It's a longtime favorite. Current navy chairs are just temporary ones I grabbed a few years ago when hosting a big dinner. I can't recall where I found them but they will need to be replaced asap as they hardly have any cushion left in them. I could not find a runner long enough for the table so I overlapped two. 

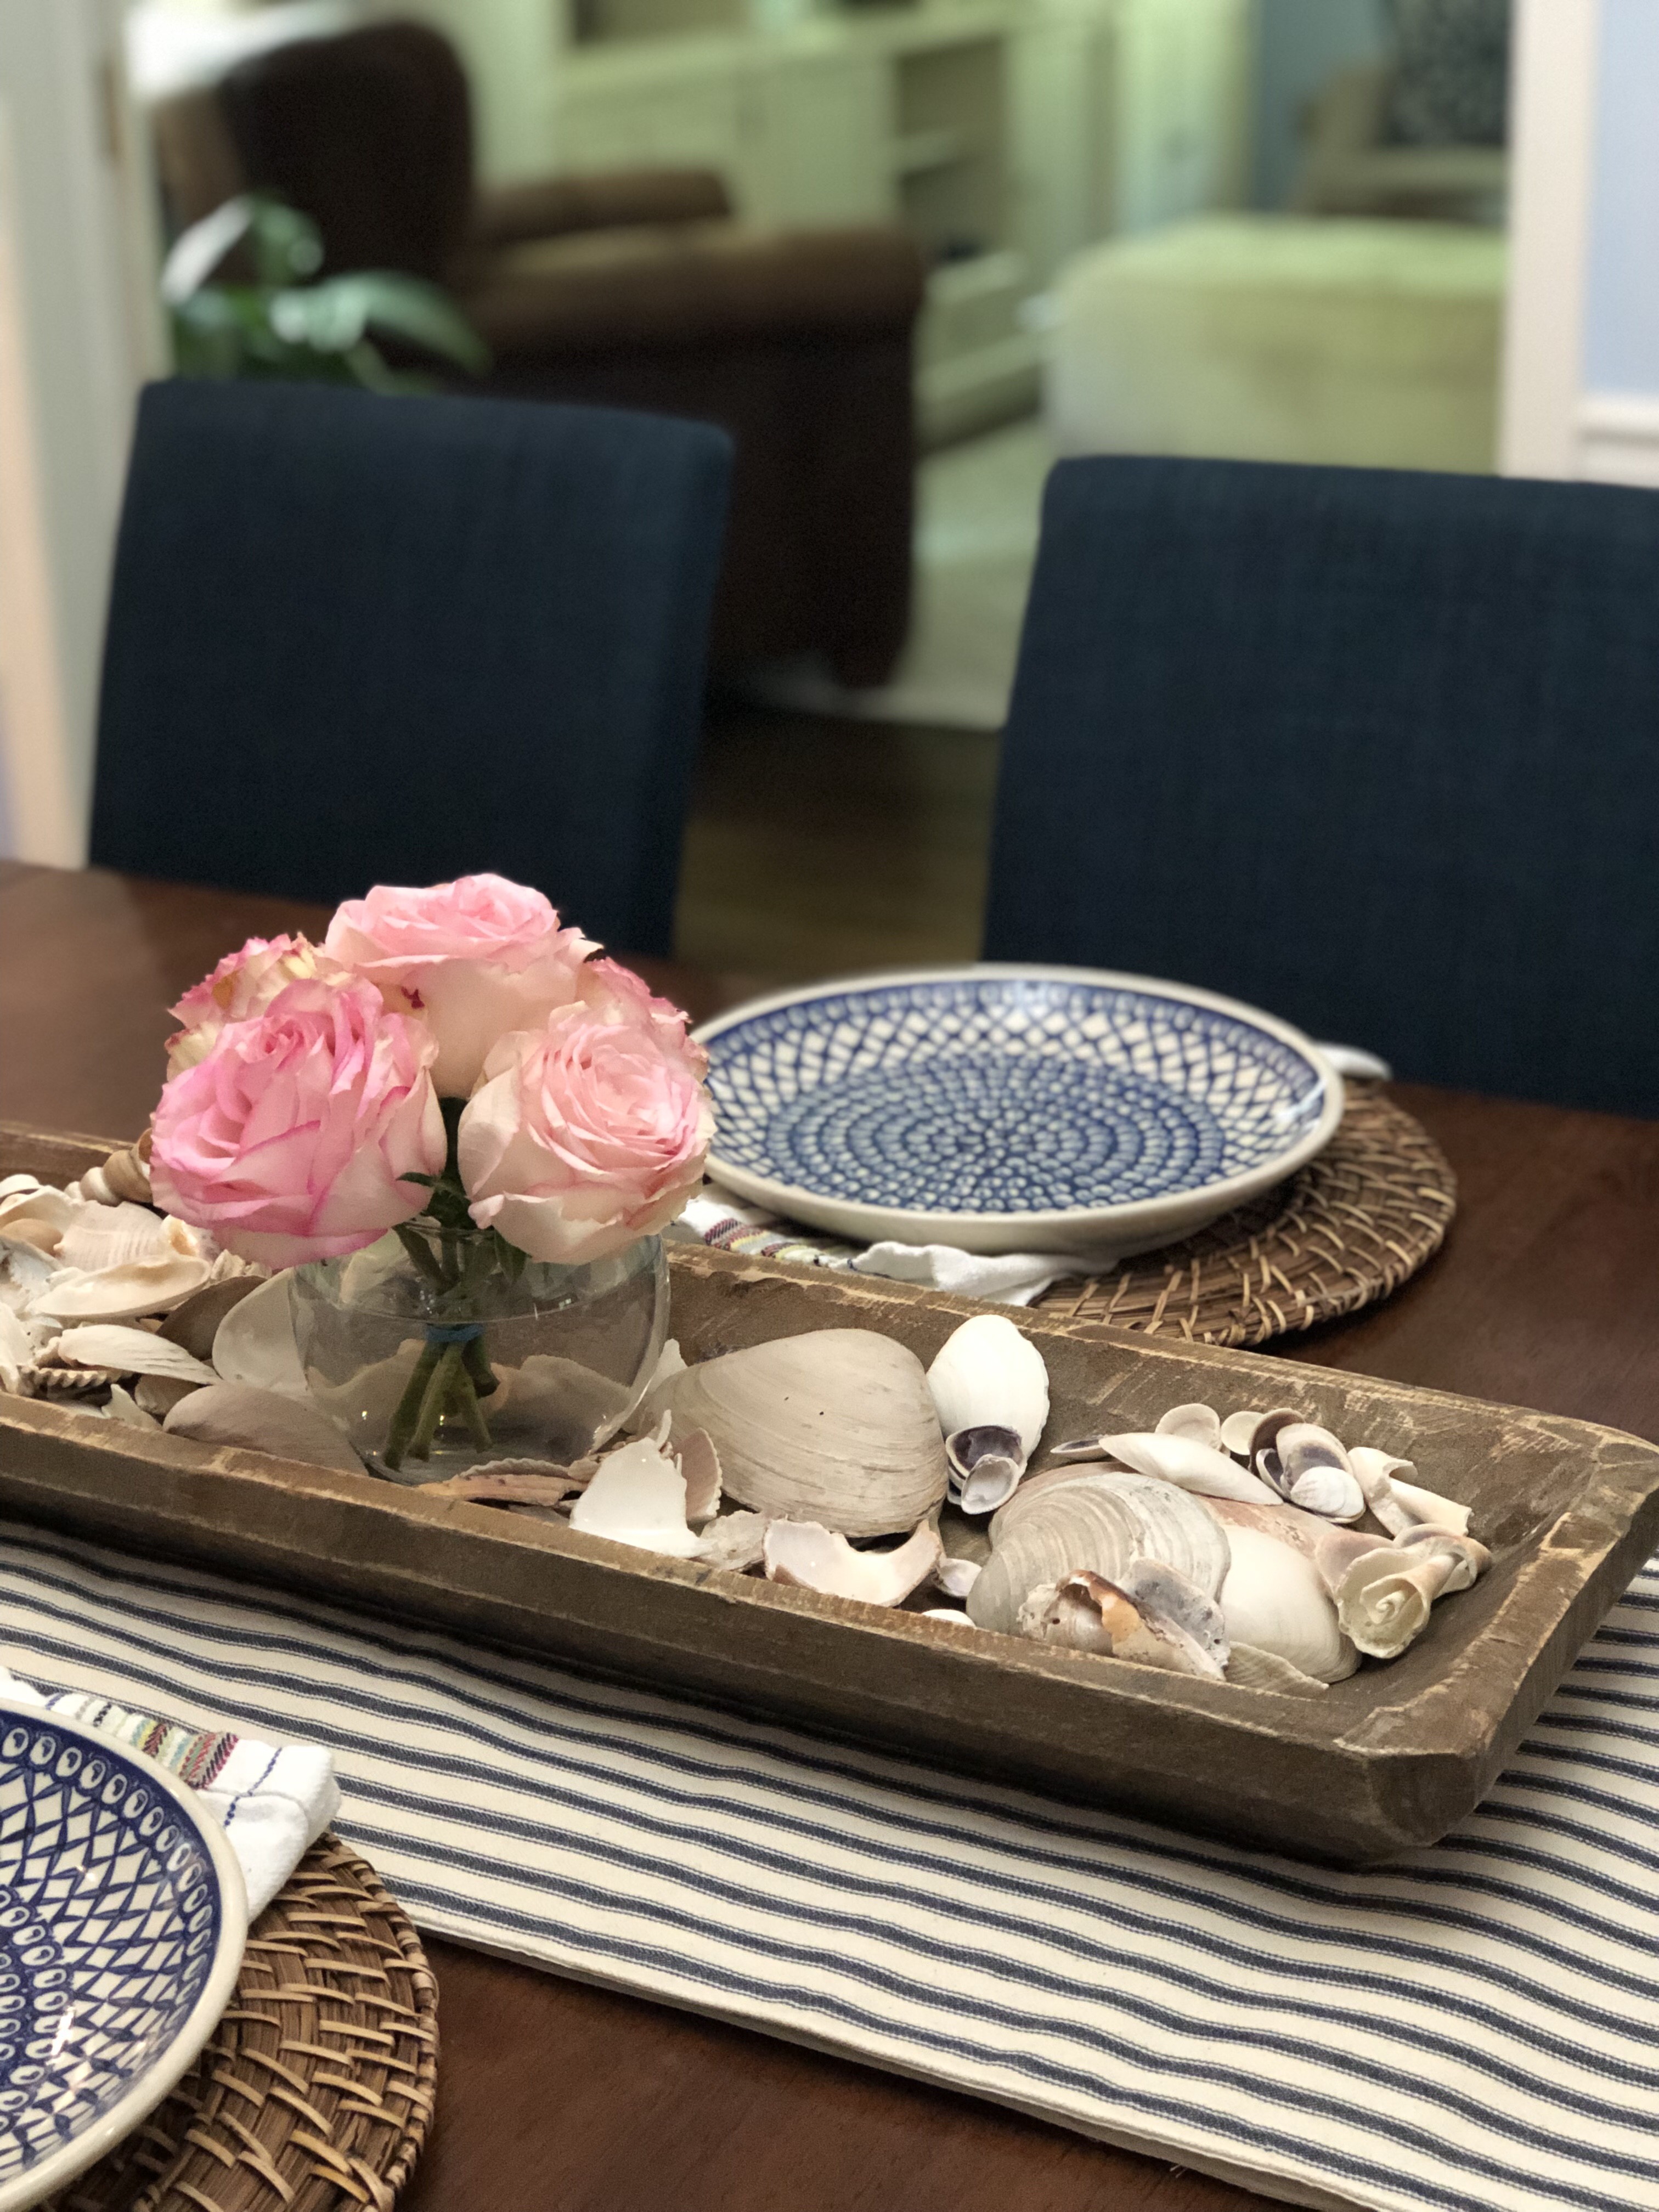
While unpacking, I came across several bottles of shells collected during our various family beach trips. Some were labeled, and some were not. Instead of keeping them separated (and shoved, unseen, onto shelves) I poured them out to serve as part of our everyday tablescape. The boys swear they remember finding certain shells :)!

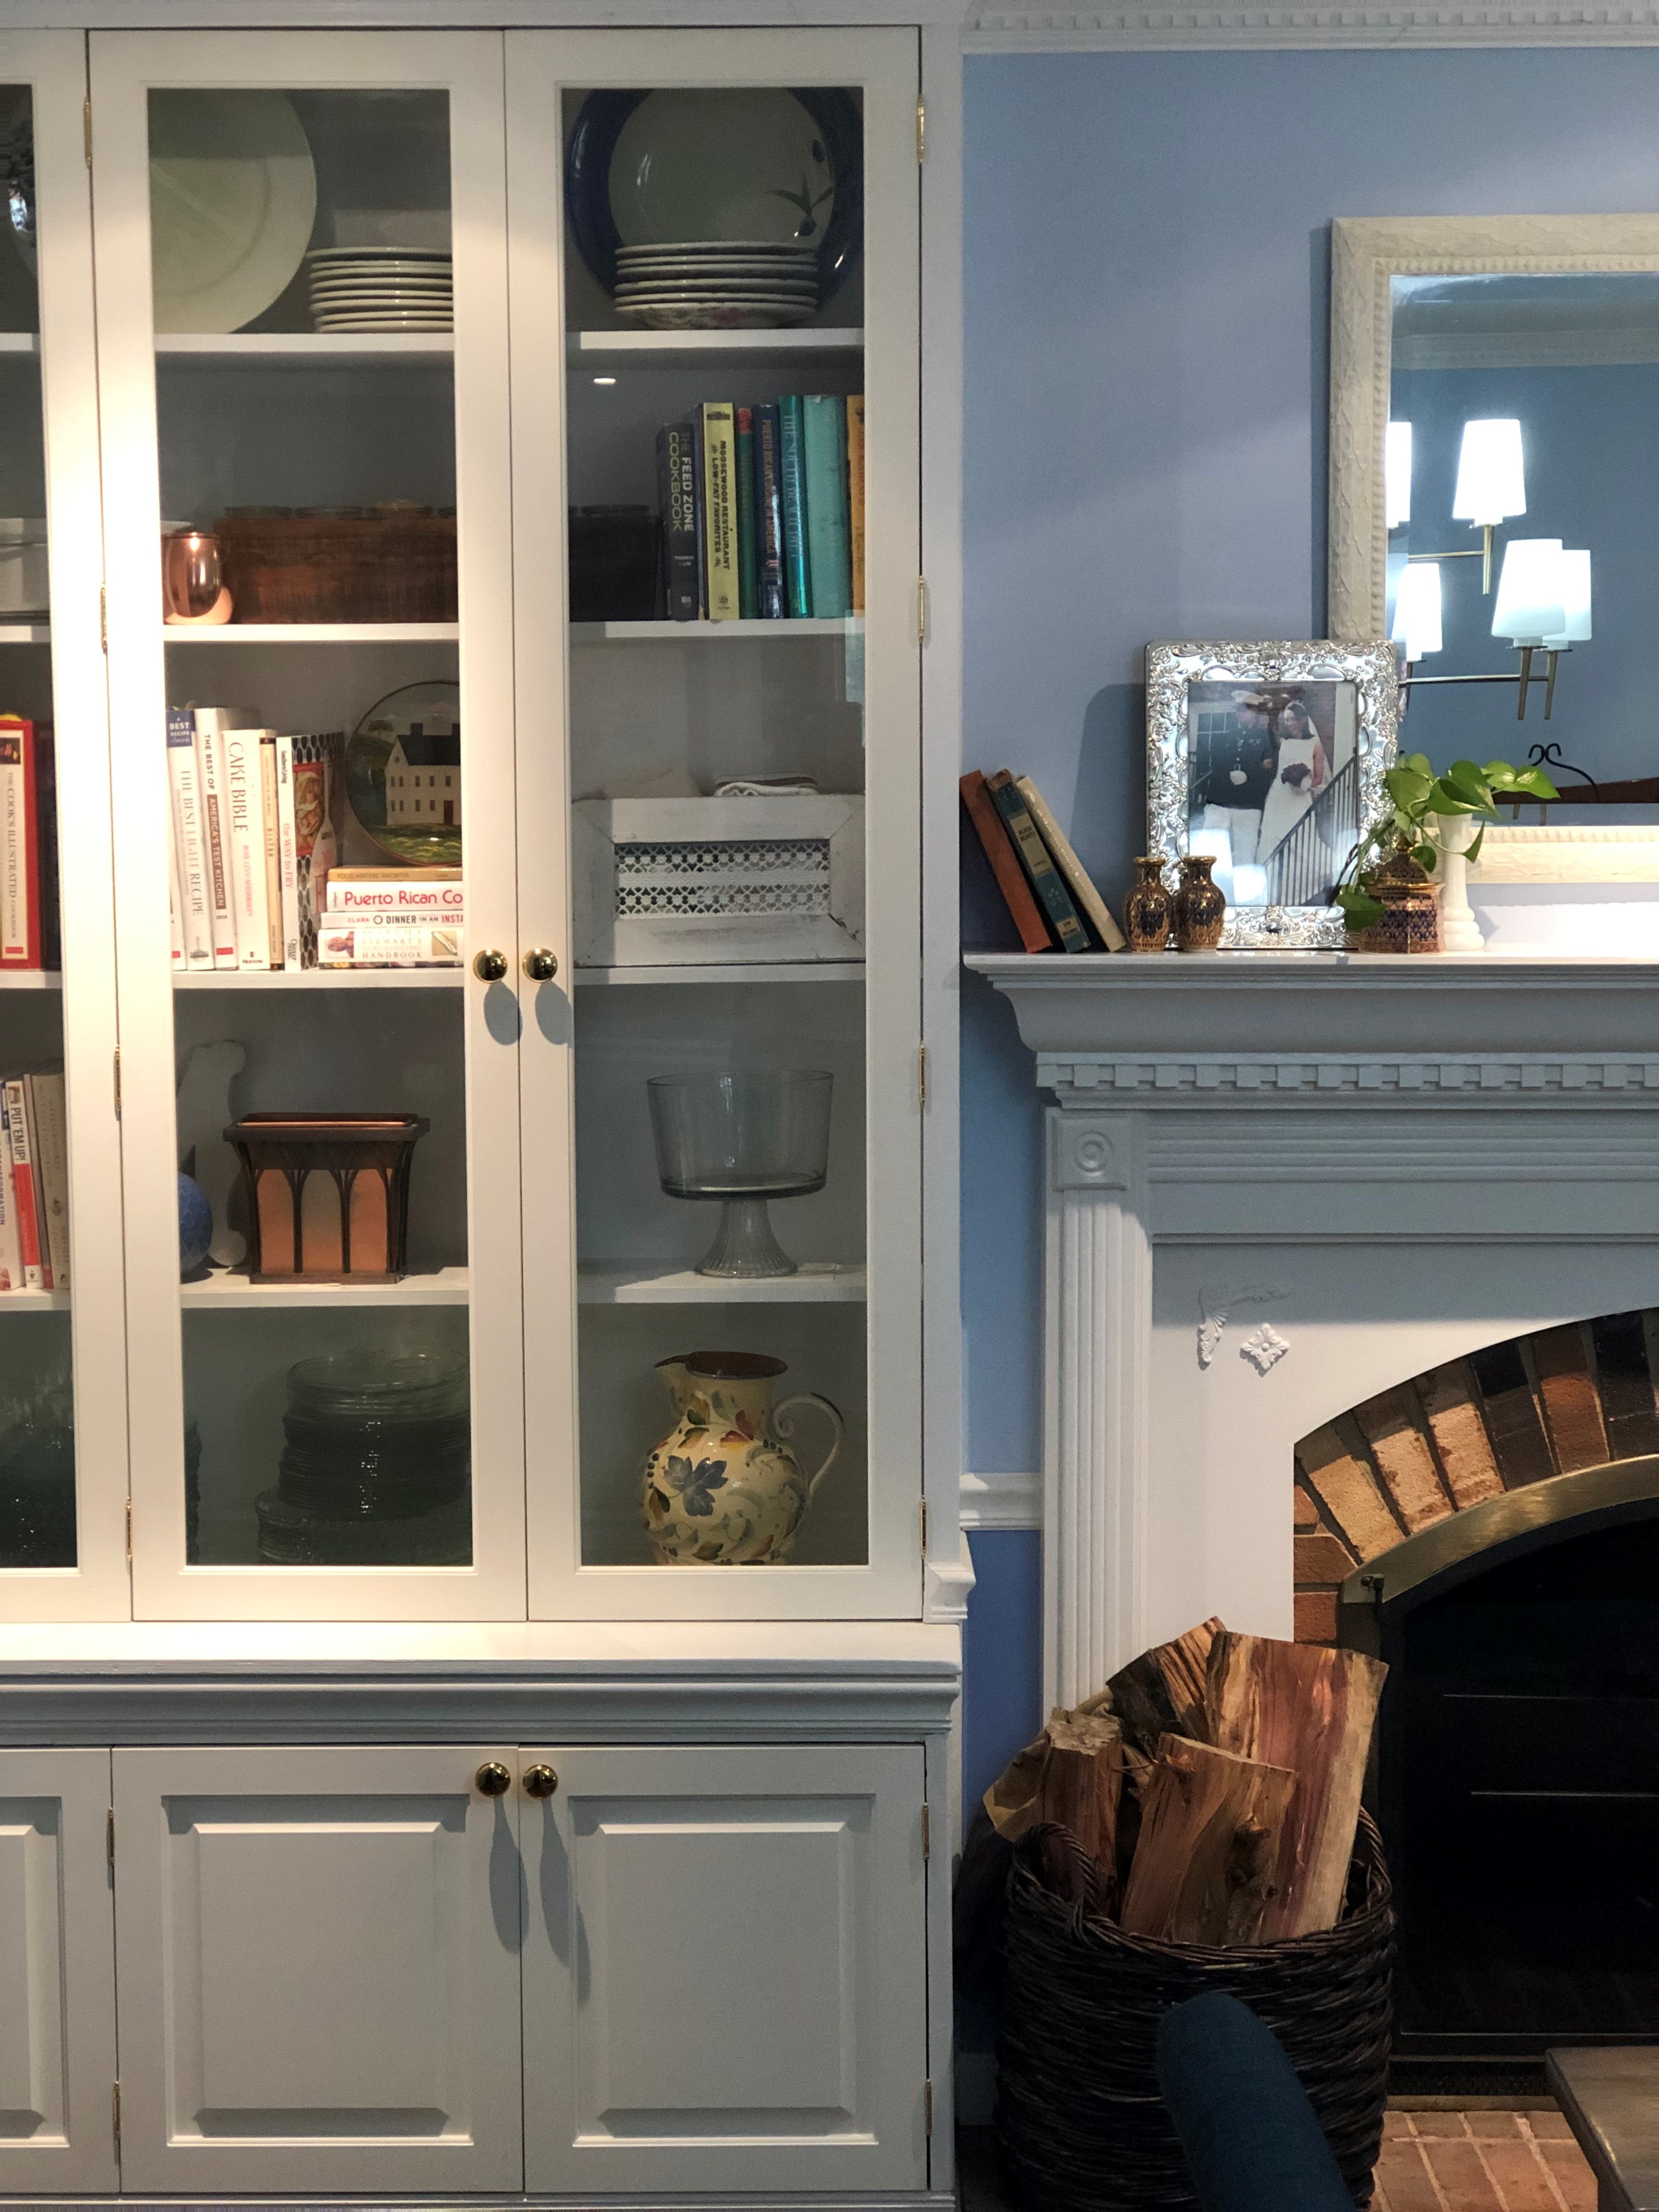
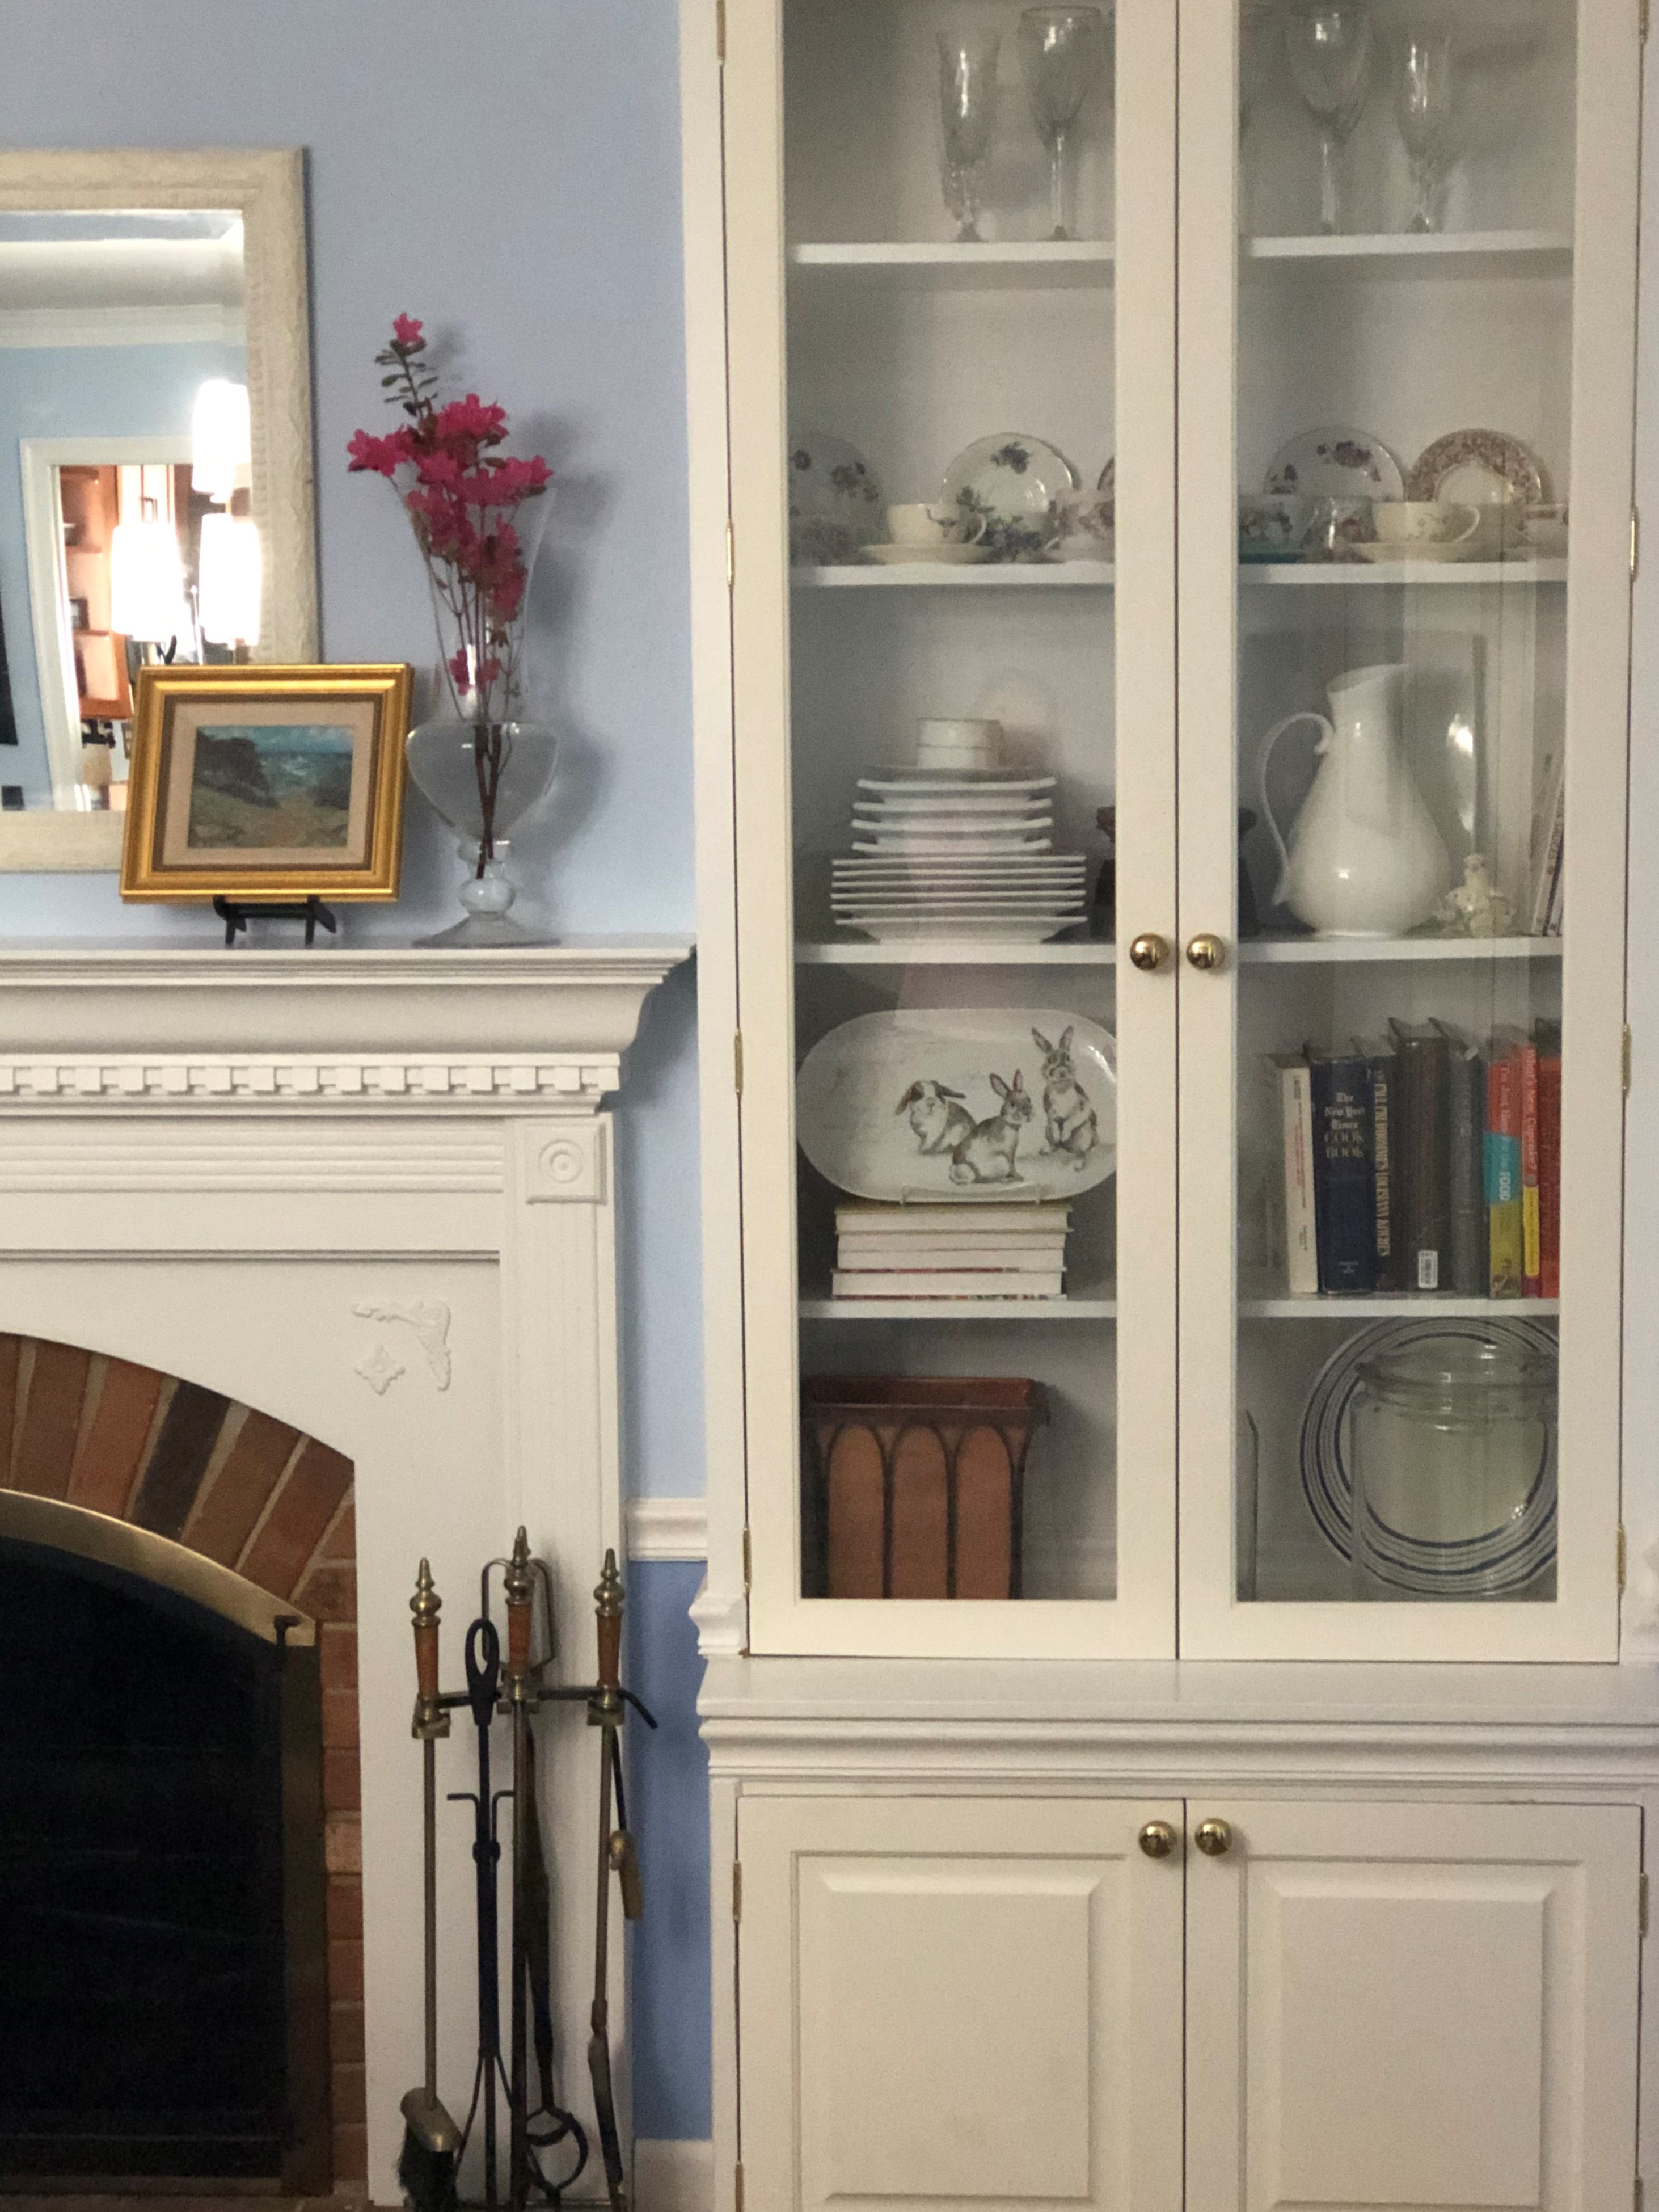
For now, the built ins flanking the fire place are housing an assortment of serviceware. I also added in my cookbook collection. Still working on the styling but am very happy to at least have our things out of boxes. 

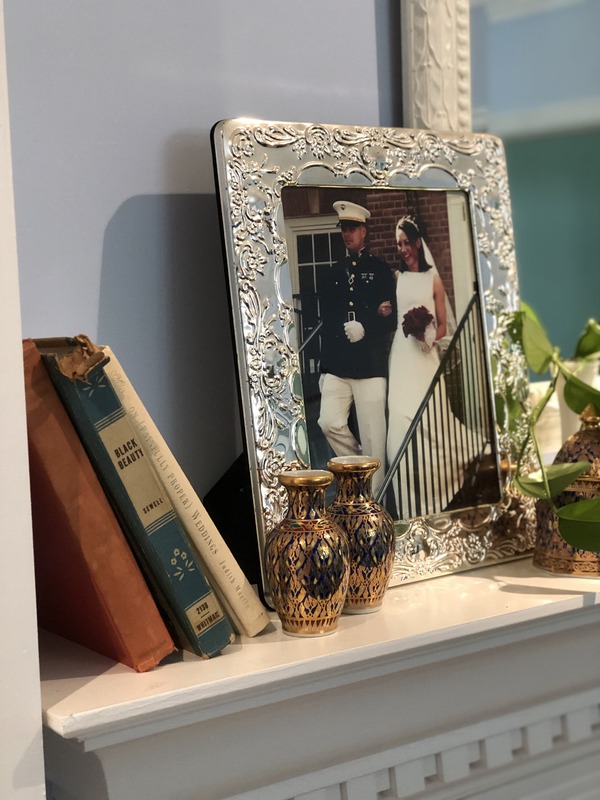
The mantle is currently styled with a mirror I painted, old books and a wedding photo. Most of the finishes and frames from our last house are silver tones or black. To try my hand at mixing metals, I added in some of my Thai pottery I've collected for years. I believe every room needs a touch of greenery so the sprig is a cutting I am trying to root.

All in all, I am thrilled with the space. What remains: selecting wall color; finding new dining chairs; replacing wall sconces; adding some art; jumping on the faux fiddle leaf bandwagon. This room is windowless so it's the only option. And I've seen some faux versions that are incredible so although I never thought I'd go faux, I'm extremely tempted.

Next up, the powder room gets fully gutted!

Friday
Mar122010

A clean slate.

I've begun spring cleaning.  And every year as I clear the clutter a bit, I am struck by how monotone our living room is.  It was never intended.  It sort of looks like I was interrupted in the middle of decorating, right before adding in the personal touches that really make a room.  And of course that's exactly what happened.  But I try to not begrudge my little interruptions.  Especially as I watch them grow impossibly fast.  The room, after all, can wait.  But impromptu hide and seek sessions and tickle monster attacks most definitely cannot. 

Nevertheless, I was still a bit surprised to realize it has been nearly four years since I last thought about "decorating" the room.  And since spring and all the clean corners seem to bring about a certain ambition, I plan to pick up where I left off and finally add a much needed jolt of color by way of some pillows.  And maybe, just maybe, some drapes.   

I will leave up the sheers because I still like them.  They have served us well, despite the torture they endure most days (more on that in a bit).   A friend was over and asked about them, as she was having a hard time finding the right length in window treatments.  When I explained to her what I did she called it clever, so I thought I'd share.

First, to take the look up a notch (literally), I made sure to mount the hardware closer to the ceiling--see that in the picture?  Do not merely mount the rod right above the window.  The trick to making your ceilings appear much taller than they actually are is to mount your rods higher. 

Next, I ordered some semi-sheer tab top panels--from Overstock, I think--in the longest length possible and hung them up.  This allowed me to fold and pin the bottoms in place as I determined exactly where I wanted the curtains to hit (I went for a soft break right at floor length, no trendy puddle).  After that, all it took was a quick zip through the sewing machine over the original seam.  The bottoms are just ironed--there is no stitching.  I really like the detail that the double layer of fabric gives to each panel.  You could also easily add a ribbon or other trim for some color. 

I know that this is beyond basic for many of you.  But I also figured someone out there could relate to needing curtains pronto.  And this method, despite its ease, actually delivers window treatments worthy of hanging up in your grown-up space.  But that minimal time investment also means you won't cringe when you see a little curtain mischief going on.  Actually, make that a lot of curtain mischief...which makes me wonder, do little girls do this, too, or is it just boys?  Or is it just my boys??

I'll post pictures of the revamped room soon.  I'm sure it'll be within the next five years.

Saturday
Nov212009

Random tips.

My father forwarded me one of those long emails filled with random tips.  It made me smile because he prefaced it like this:

"FYI.  Maybe you know all this stuff already.  Dad"

I of course didn't know most.  But I love that my dad thinks I may have somehow picked these up already.  He knows I'm a tip hound. Here are some that were new and interesting to me.  I have no idea whether they work but will definitely try them.

  • Take your bananas apart when you get home from the store.  If you leave them connected at the stem, they ripen faster. 
  • Peppers with 3 bumps on the bottom are sweeter and better for eating.  Peppers with 4 bumps on the bottom are firmer and better for cooking. 
  • Add a teaspoon of water when frying ground beef to help pull the grease away from the meat while cooking.
  • Heat up leftover pizza in a nonstick skillet on the stovetop, over med-low heat until warm. This keeps the crust crispy without burning the toppings.
  • For easy deviled eggs, put cooked egg yolks in a zip lock bag.  Seal, mash, add other ingredients, reseal, mix thoroughly, cut the tip of the baggy, squeeze mixture into egg.   
  • **Can't believe I've never thought of this one**When you buy ready-made frosting, whip it with your mixer for a few minutes to double in volume.
  • To warm biscuits, pancakes, or muffins that were refrigerated, place them in a microwave with a cup of water. The increased moisture will keep the food moist and help it reheat faster. 
  • **I think this one is brilliant**To get something out of a heat register or under the fridge add an empty paper towel roll or empty gift wrap roll to your vacuum. It can be bent or flattened to get into narrow openings.
  • If you seal an envelope and then realize you forgot to include something inside, just place it in the freezer for an hour or two. Viola! It unseals easily.
  • **I immediately did this one and was amazed**Even if you always clean your lint filter in your dryer, it may still be clogged.  To check, take your filter to the sink and run hot water over it.  If water does not pass through, it means a film has formed over the mesh, caused by residue from dryer sheets.  The best way to keep your dryer working for a very long time (and to keep your electric bill lower) is to take that filter out and wash it with hot soapy water and an old toothbrush (or other brush) at least every six months.
  • Wednesday
    Oct072009

    Works for me Wednesday, cleaning tip.


    I'm participating in We Are THAT Family's 'Works For Me Wednesday' and this week's theme is cleaning tips.  

    I have a quick and simple tip about how I clean and polish our stainless steel kitchen appliances.  When we first got them, it drove me crazy how every little hand print and smudge showed up.  And many of the recommended cleaners I tried left ugly streaks.  Then I found out what store employees use to keep stainless steel appliances looking snazzy:  baby oil.  And because a showroom floor and my kitchen get roughly the same amount of traffic, I decided to try it.  You only need a couple of drops on a soft, lint-free cloth.  It's really worked for me so I hope you'll give it a try.

    Wednesday
    Sep302009

    Stick 'em up.


    The other day, I was over at a friend's house for a playdate and I noticed that she had labeled many household items to encourage her budding reader.  It reminded me of a couple of years ago when Max started reading and our house was also covered in tape and index cards.  But as I began taping up cards for Leo, littlest pumpkin Will followed behind me, collecting the cards as fast as I could put them up.  Or worse, he would move them and I wouldn't notice until I heard Max saying, "mom, why is the 'door' labeled 'potty'?" 

    I needed a new plan.  I didn't love the index cards anyways--with three boys, you can probably guess how yucked up they got.  But unless you also have three boys--and incidentally, if you do, could we please start a group or something?--you probably don't know how fast they got yucked up.  Well, it's fast.  Like, by dinnertime the day I put them up fast.  And I also didn't like how messy they all looked, flapping about.  But that's probably just at my house due to the constant wind tunnel from the racing track an open floor plan apparently encourages.  Don't get me started.

    In a perfect world, I wanted to print on something because my hand writing would in no way encourage reading--squinting, yes; reading, no.  I also wanted labels that would stay up, be wipeable, removable, and repositionable.  Yes, I ask for a lot.  I had some vinyl and tried to print on it, but four paper jams later I discovered that the ink never completely dries on it.  Smear city was less than ideal.

    Eventually, I did just hand write the words, but I traced a nice font.  I then topped it with more vinyl for extra durability.  I trimmed them down and played a game with the older boys:  they drew a label, had to read it, then stuck them up. 

    They stick everywhere and stay put, even on a porcelain sink.  And yet they are removeable without any residue.  And you can wipe right over them.  And if a little munchkin happens to pull them up, they go right back as they are repositionable.  Nice.

    Supplies

    • Clear/transparent vinyl (I used clear Con-Tact paper)
    • Print-out of words in an easy-to-read font (unless you have nice penmanship, in which case I'm jealous)
    • Permanent marker/paint marker in dark and light (use the light color for labels for dark furniture)
    • Scissors

    Directions

    Decide what items you want to label and print out your words. 

    Top your word sheet with your vinyl, leaving the backing on, and trace your words, using a dark or light marker.

    Top you labels with another sheet of vinyl.

    I like to trim close to the lettering to make the label less obvious.  Peel the backing and label away!

    I also like to use the labels to encourage sorting, e.g. clothing labels for drawers or toy labels on bins.  And for our youngest, I draw pictures instead of words.  Let me know if you give it a go.

    Wednesday
    Sep092009

    Couponing.

    I think the transformation to full-time homemaker is now complete.  I am officially using coupons in my weekly grocery shopping.  And I am saving a bundle! 

    I've tried to use coupons before but always failed.  Miserably.  Does the following sound familiar?  Like a good little saver, I kept the inserts from the Sunday paper with good intentions.  But then there they'd sit, usually unclipped, in a corner of our breakfast nook, piling up, mocking me.  And if they actually did get clipped, it was on a rare occasion that they'd actually make it to the grocery store with me.  And even if I did manage to take them to the grocery store, I'd then stand paralyzed in the aisles doing math, until inevitably deciding that saving 50 cents off the name brand cheese did not save any money when the store's brand was cheaper--without a coupon.  So I wouldn't even use the coupons!  It's no wonder I gave up again and again.

    So what's changed?  I'm using the website called The Grocery Game.  It's a resource that lists all of the sales, both advertised and unadvertised, in your select area store.  I chose Harris Teeter as my store--which I'd previously sworn off as too expensive.  But last night, using my list from the grocery game and my coupons, I bought $198 worth of groceries for $104.  I did this by stacking coupons on top of the good sales. 

    Every week, the grocery game crosswalks all of the coupons that are "out there" from inserts or other sources with the store's sales.  The list is then color-coded to tell you whether the sale items are at their lowest price for that store's sales cycle.  You look at the list, reconcile it with your coupon stash, and decide what to buy.  You try not to buy things at full price unless you need them.  Instead, the key is to stockpile items when they are at rock bottom prices--before you need them.  That way, you're never paying full retail.  And let me point out that this is different than buying in bulk from a warehouse club!  Because although you may get your name brand toothpaste for a good price if you buy a four-pack from Costco, you're probably not getting it for a steal (e.g., .50 each, which is what I did by buying it on a good sale with a coupon).  Also, I have not paid over $1.75 for a box of cereal in over a month.  Do you know how much cereal the boys devour?    

    As for how much time it takes, now that I've got everything organized (I am using Money Saving Mom's method to organize my coupons), I spend about an hour a week to put my list together and pull my coupons.  It took me about three weeks to get a good stash of coupons to use.

    A huge reason I like it is because now I can have a fully stocked pantry without cutting back on all the fresh produce, seafood, and meat we love.  Although I cook five nights out of the week, pretty much from scratch, I still enjoy having some prepackaged convenience items, like rice packs, soups, marinades, and so on, on hand.  I am picking those things up at a steep discount--sometimes they are even free.

    The service kicks off with a free four week trial.  After that, it is $5 a month for your first store and $2.50 more for any additional stores--they bill you every two months.  And just so you know, I'm not an affiliate or anything (though I believe there is a referrer program).  Just a happy customer so thought I'd spread the word.  And, yes, I know you savvy savers out there can cobble this sort of information together through other various online sources.  But I tried that and never seemed to find the time to pull it all together.  Plus, I don't know prices well enough to know whether a sale is a must-buy sale or whether I should wait it out--The Grocery Game does all of that for you.  So I'm okay paying $7.50 (I subscribed to Walgreens, too) for the convenience of accessing everything in one place.  Especially since last month I saved just under $500 (!!!) on my grocery and household purchases--and I've made a large dent in stockpiling our necessities.  If you give it a go, make sure to do it the full four weeks before deciding whether it's worth it.  As the holidays approach, I think we could all use a little extra wiggle room in our budgets.


    Wednesday
    Sep022009

    Art organization.


    If you are like me, you cherish your children's artwork but struggle with the sheer quantity that accumulates.  At the end of the year we try to file away special pieces--each child has his own flat storage box that keeps things sorted and safe until later.  And by later I mean until they are in their 30s and I'm pestering them to clear out their rooms because their dad and I are downsizing in our retirement.  And we're buying a fabo townhouse in the city!  Where we'll walk to everything!!  And we won't need much space because we'll be out and about traveling and visiting our kid's kids!!!  And we'll.....oh, wait.   

    Back to a mountain of art, bless their little creative hearts.  Before the purge, this is where a lot of the artwork lives.


    I'm sure you've seen it before.  It's a couple of affordable curtain rods (mine are from Ikea) and curtain clips, hung on a wall in our basement play room.  And just so you know, I fought every fiber of my perfectionist-being to not sort that rod and instead shoot a picture of its jumbled reality.  As you can see, you can fit a ton on there and there are some favorites that the boys have deemed evergreen, or appropriate for any season, that they will not let me take down.

    Recently, I've seen some blog posts on additional art storage/display ideas, which have sparked some thoughts of my own.  But first I need to hit up some thrift stores, so my grand plans will have to sit until the smallest two munchkins start preschool and pre-K.  Which, in case you're counting, is in 7 days and 17 hours.  And yes, I'm a little freaked about baby Will starting preschool.

    Tuesday
    Aug252009

    Cupcakes at hand.

    Cupcakes.  Who doesn't love cupcakes?  I have been a huge fan (some would say pusher) well before boutique bakeries opened on every corner and made them trendy.  I like to always have the option of breaking some out for even the most impromptu of celebrations.  Here's my not-so-secret secret--they freeze beautifully.

    When I make a batch, I set aside a half dozen for us to enjoy right away (naturally).  Then, I freeze the remaining dozen and a half from a standard batch--frosted and all (I like to put them back in the baking tin after they are frosted to set up in the freezer).  Once frozen (the frosting will get firm but never rock hard), I pop them into a ziploc to be handy as needed.  If you do this, just be sure to take them out of the ziploc while still frozen and allow to thaw at room temperature to keep the frosting lovely.  So, you just remembered tomorrow's school party?  No problem.  Spontaneous neighborhood happy hour?  Bring it.

    If you make your cupcakes with fresh ingredients, I would not let them go in the freezer for more than 30 days (actually, we've never even come close to the 30 day mark--they get eaten up like crazy--so that's sort of a guess).  Oh, and another tip.  Next time you're shopping at a craft store, pick up an oversized frosting tip--I can frost two dozen cupcakes in no time with one of those!