Shop Duck Duck Wool

Where was that?
Updates

Enter your email address:

Delivered by FeedBurner

Look around
Pumpkins One, Two, and Three (and Me)

when I started the blog...

and a few years in...

and now...

3pumpkinslittle on Instagram 


Entries from June 1, 2010 - June 30, 2010

Tuesday
Jun292010

Easy oven chicken recipe.

Busy, busy, busy.  No different than any of your summer calendars, I am sure.  But honestly, I have no idea what I was thinking.  I signed up the older boys for karate, tennis, and soccer lessons.  Throw in swim lessons and/or swim team practice and all the other summer fun we're trying to schedule and it gets a bit crazy.  Okay, a lot crazy.  Someone check my head.  I think I panicked in trying to keep our oldest busy this entire summer.  It's his first full summer because his school was previously on a year-round schedule but is returning to a traditional calendar year.  And it's completely like me to overdo things.

And of course, even when we have lots more to do, it's not as if the other stuff goes away.  So I thought I'd share one of my secret weapon recipes.  It ensures a hot, home-cooked meal in front of my family no matter how whack-o I went with the activities.  I'm surprised I've never posted it--it is my go-to chicken dish recipe and I scribbled it down from an online site way before I was blogging so I apologize I can't point you to the original source.  Also note that it's a great "food brigade" dish for new mammas and pappas...especially if there is another little one in the house as it is very popular w/ the kidlets.  I made it last week and dropped it off at the home of our newest neighborhood addition.  And I made a big batch for us to enjoy too--we never get tired of it.


Easy Oven Chicken Recipe

*even though I hate to fire up my oven during the height of summer, this one cooks up pretty fast so it's not completely insufferable. 

Ingredients:

  • 1 garlic clove, minced
  • 1 stick unsalted butter, melted
  • 1 C dried bread crumbs (if you use Italian flavored, omit Italian seasoning below)
  • 1/3 - 1/2 C grated cheese (Parmesan is our favorite but any cheese is great--cheddar or Monterey is fantastic if you want to swap out everything Italian and make it southwest...)
  • 2 Tbs fresh parsley chopped (or any fresh herb that "works" with your flavor profile)
  • 1/4 tsp kosher salt
  • 1/8 tsp black pepper
  • 1/4 tsp garlic salt
  • pinch of Italian seasoning (omit if using Italian bread crumbs)
  • 2 lbs skinless, boneless, chicken meat, cut into pieces no larger than 2x2 inches (I always have chicken breasts already prepped for this in the freezer)

Directions.

1 Preheat oven to 450°F.

2 In a bowl, combine the minced garlic with the melted butter.  In another bowl mix together the bread crumbs, cheese, fresh herbs, salt, garlic salt, Italian seasoning, and pepper.  Dip chicken pieces into garlic butter, then into crumb mixture to coat.

3 Place coated chicken pieces on to a 9x13 baking dish. Try to leave a little room between each piece. Drizzle with remaining garlic butter and bake uncovered 15 minutes, or until chicken is cooked through and juices run clear. Note that the chicken will get much more browned on the bottom side than on the top.

Note:  If you prefer, you can use yogurt or an egg wash for the "wet" stage, in lieu of the butter.  But I'm not going to lie, the butter is better.

Serves 4-6.

Enjoy!

Sandra

Monday
Jun282010

My new favorite tote.

I, for one, cannot have too many totes.  Especially during the summer.  Endless uses:  pool bag, wet pool bag, library bag, knitting bag, sewing bag, so on and so on.  And oh, let's not forget to mention a rush-to-the-urgent-care bag.  The kind that swallows up favorite board books, a change of clothes, diaper needs, snacks, and medical records and yet still has room for a panicky momma's things.  The kind that gets you out the door fast but not looking nearly as bewildered and harried as you actually are because little man lost his footing on a two-feet-high plastic Little Tykes slide and somehow managed to hurt his arm even though he regularly negotiates seven-feet-high slides and runs with the big boys incident-free. 

More on that in a bit.  This is about the tote.

I cannot count how many reusable grocery bags I have sitting at-the-ready in the pantry.  They are like bunnies.  They multiply.  But they are neither particularly cute nor comfy.  Instead, I have long envisioned a certain tote shape.  The It Tote, if you will.  Something with a vintage-y vibe, not too big, not too small, and most importantly...something worthy of diving into my stash.  You know how it is.

I started searching freebie tutorials for "my vision" and had no luck.  I nearly gave up and decided I'd just draft it up--I know how to sew up a basic tote and what I had in mind was pretty basic with one specific detail.  But then I stumbled upon Ali Foster's patterns.  Her reversible tote design was just about perfect.  And so I bought it and stitched this up.

And in case you were wondering, the specific detail I sought was the continuous double circle handle straps.  A simple thing, yes, but you'd be surprised how few tote designs have it.  And I love it.

I also picked up a couple of other patterns.  Ali is running a great deal in her Etsy shop--3 patterns for under $10.  AND she gives you permission to sell creations from her patterns.  I still have hopes of reopening my Etsy shop or doing a farmer's market sale and would love to stock it with some fun purses and clutches.  As a side note, I have no affiliation to her shop.  I just love her designs and am a happy customer. 

For the fabrics, I repurposed some lovely nubby, linen-look cream colored fabric that was left over from a recent drapery project.  And for the reversible interior, I used a pretty print I've hoarded for quite some time--I wanted something summery but in black to match the dressform screenprint I added. 

This is supposed to be my sewing bag--to group ongoing projects or pattern ideas that need things for progression.  The idea is I'll just grab it when I'm headed out thrifting or to a fabric store in search of the right trim, fabric, or other notion.

A post will follow about the screenprint.  I finally tried out using my Cricut to cut out the stencil.  I haven't mentioned that Santa brought me a Cricut Expression, have I?  Well, that's because it seems a little excessive for this scrapper-who-once-was, but I hear Santa scored an amazing Black Friday sale on it, so Yay Santa. 

I have not used my Cricut to its fullest potential but I've finally decided it was time.  I'll post about the two software programs I used to design the dressform and even include the file in case anyone else is interested.

Back to Will.  He spent the weekend in a soft cast and was none too happy about it.  Hopefully it will come off today and he can go back to terrifying me on the big-boy side of the playground...he is not allowed near any innocent looking, plastic, baby slides!

Happy Monday.

Sandra

Linking up here...

The Girl Creative

Making

The DIY Show Off


Friday
Jun252010

Summer, week one.

Who gets a stomach-bug-slash-head-cold in summer anyways?  I'll give you one guess.  It's the same person who usually never gets sick...I even amazed my nurse practitioner during all three pregnancies because I never caught a cold.  Not even the sniffles.

But this year--my goodness.  I've had more bouts of things here and there...too many to count, really.  And I've had it.  And so has my family.  I am a horrible sick person.  I want to be coddled while simultaneously left alone. 

Luckily this round hit me the first week of summer vacation with all the kidlets home full-time and looking to me for entertainment.

But I'm better now and here are some highlights of the week (trust me, you don't want the lowlights).

Max joined junior swim team.  It was not planned and the gusto with which he approaches practice is rather shocking--they practice every weekday.  A couple of weeks ago, this child could barely doggie paddle from short end to short end of the pool.  And that was only if you forced him--he much preferred hitching a ride on Charlie's or my back.  And the deep end?  Forget it.  He wouldn't even stick a toe in unless an adult  went with him.  Yet after practicing for 2 and 1/2 weeks, he swam his first meet.

Since nothing was planned, we had not yet bought him his team's swimming gear (that stuff is expensive!).  And he kind of stuck out.

It didn't help that he had no idea how to stuff his mop of hair into a cap...

or that he happened to be lined up with some bigger kids...

or that he had no idea what to do at the start line.  When the announcer said, "swimmers, take your mark," I could almost hear Max's mind saying, "who's 'mark' and where, exactly, am I taking him?"

He had no idea how to dive in, but once he saw what the others did, he just gave it a shot (a good two seconds after everyone else launched)...

Charlie and I weren't sure he could make it the entire length of the pool and exchanged some nervous glances.  But we knew they'd throw him a paddle board or give him a lifeguard (this was a B meet) if he needed it...

But he made it.  All on his own.


I know many folks have kids who take to water like fish.  But our two oldest have not so this is thrilling.  Leo starts swim lessons next week.  And we are very hopeful that Max's enthusiasm rubs off.

As for the crafting front, I did manage to cut out and prep some fabric for a little project I've hand in mind (for myself!) for ages.  Here is a sneak peek...

Happy Friday!

xxxx, Sandra


Monday
Jun212010

Pick, 2010.

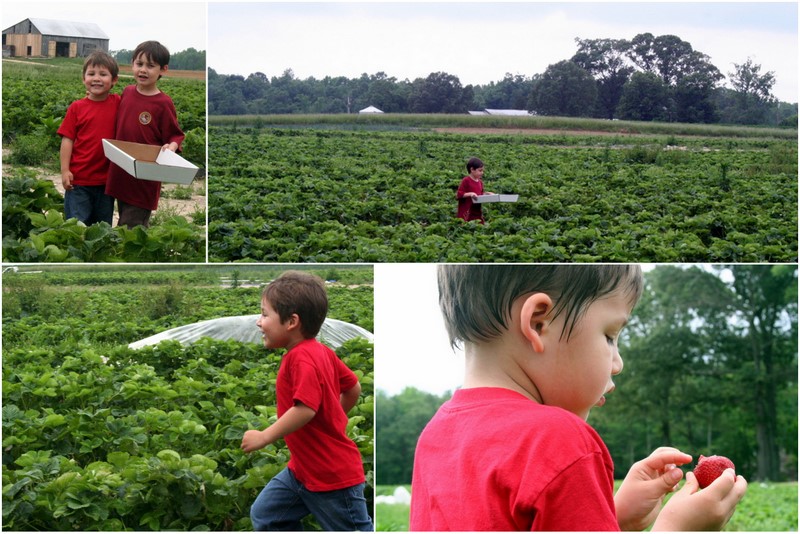
Similar to last year (and, in fact, every year since Max was born), we did our annual trip to the strawberry fields and picked a couple of flats.

It was a good day for it--still plenty hot, but bearable (about two weeks ago).  Max and Leo did a fair job of picking versus eating.  If I had to guess, I'd put the ratio at a solid 4 to 1.

William pretty much just wandered up and down the rows, fascinated.

(Yes, I always dress the boys in red shirts when we strawberry pick.  Ask me how I've learned....)

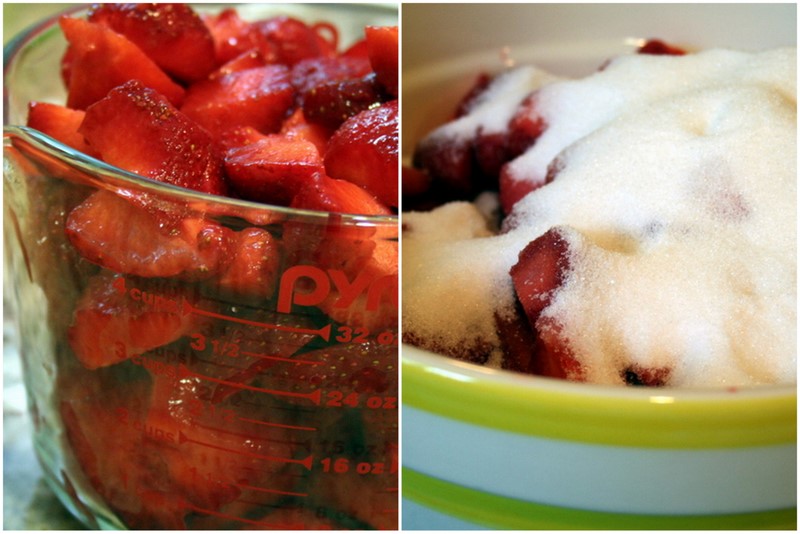
Once we were home, I hulled and prepped the mountain of berries.  Some were sent to the freezer as whole berries, packed in a simple syrup.  I love freezing strawberries this way for later use in syrups or other dessert toppings.


But about 20 cups or so were sliced up for two batches of strawberry jam.

I am really getting into canning (I think a pressure canner is inching its way up on my wishlist).  I especially love seeing all the pretty jars lined up, waiting to be filled.  How I wish I could find somewhere local to buy Weck jars; they are so lovely.  Until then, I'm enjoying the quilted jam jars I picked up last year on sale at the end of the summer.


This year I tried a new recipe...strawberry vanilla jam from the blog Food in Jars.  Both the blog and the jam recipe are crazy addictive, just so you know.  The recipe is lower in sugar than most and the addition of lemon and vanilla is just heaven in my book.  And I say this even though the first batch never set--it's no bother for us as we've enjoyed it as a syrup every weekend over our pancakes or crepes.  For the second batch, I added in a bit more pectin and it set beautifully (though it did take a couple of days).  I always make such a wreck in the kitchen when I make large batches of jam.  But it's quite worth it, I say.

We've gifted a fair share of our jars, with little picture notecards of the boys proudly picking the berries.  But we've also tucked plenty in the pantry for the year.  

Go to Marisa's gorgeous post for pictures of the process and the full recipe.  But because I plan to print my blog as a keepsake, I've also copied the recipe here, along with my notes, after the jump.

xoxo, Sandra

linking up here:

Click to read more ...

Friday
Jun182010

11th hour skirt.

Okay, not exactly the 11th hour, but we're off to the pool and I don't want to miss the deadline to enter a skirt in Crafterhours Skirt Week--be sure to head over there to check out all of the amazing skirts.

In true Sandra fashion, I put this together on the last day of the challenge.  It is a simple straight skirt with a reverse applique free-style design.  I used two of Charlie's cast off knit shirts for the fabric.  Easy peasy.

Er, that shot really makes the applique look sad.  And I don't think it is.  Maybe a close up will help...


I think I'll wear it quite a bit as a swim suit cover up as the waist band just rolls down.  I love working with knits...so fast and forgiving.

Happy Friday!

Sandra


Friday
Jun182010

A thank you gift.

Today is Max's last day of first grade.  And I simply cannot believe it.  When he returns to elementary school next year, he will take his younger brother, Leo, with him.  Leo is a rising kindergartner!  Cannot believe that either.

I had the pleasure of volunteering fairly regularly in Max's classroom.  So I got to know the other children...what a great bunch.  Yesterday was my last day with them and I tried to take some pictures to document the space and faces that captured so much of Max's time.  I will try to get that post up over the weekend.

Here is a non-identifying shot of his teacher (I don't know how she'd feel about having her face blasted across my blog!).  She is wonderful.

She and her husband are headed for a nice vacation after school lets out.  And as I thought about a good thank you gift for her, I decided on a simple bag.

It is the downloadable Monterey Market Bag pattern from Grand Revival Designs.  Max tells me her favorite color is blue so I dug into my stash and found some coordinating prints that I adore.

The bag is a very simple design--no pockets or zippers to fuss with (though you could easily add those in if you like).  The only modification I made is to lengthen the strap to make the bag a cross-body style.  I think it's perfect to take on trips, folded up and tucked into your suitcase or purse and ready to pull out when you're shopping and come across a must-buy souvenir. 

I hope she likes it.  But most of all, when she pulls it out every now and then, I hope she thinks of her first first-grade classroom at our school (she was a new teacher this year).  And a little dark-haired boy and his mommy who think the absolute world of her.

Thanks for everything Ms. P!  Have a happy summer. 

Sandra


linking up here:

Making

The Girl Creative

Wednesday
Jun162010

Little scrap coasters.

I've been cutting 4" squares of scrap fabric and using them to sandwich terry fabric that I salvaged from a baby blanket William never favored.  They are fairly addictive to stitch together into coasters.  I think they make lovely hostess gifts to keep on hand--our summer calendar is filling up nicely with bbq invites and party plans.

I made a little stack to send to someone as a very belated present.  Hope she likes them!


ETA:  I received a couple of emails asking for a quick tutorial.  And I was going to, but then I checked out the blog of one of the commenters and discovered she's already done so!  And she's much smarter than I am because she cuts the interior batting a bit smaller...my edges can be a bit bulky so I will be using her method from now on.  I wish I had seen her post before I cut out all my squares!  Go to Motherlode and check it out.


Linking up here


Wednesday
Jun162010

Just for fun.

Max is enjoying a fun last week of first grade.  Tomorrow is a school picnic and a little play.  Today was wacky tacky day (I'll snap a shot when he gets home).

Yesterday was crazy hair day.  There used to be a time when I "did" my hair every day (a given considering I grew up in Texas in the 80s).  But with my current lifestyle, I'm lucky to get it into a ponytail.  There's just not a lot of styling products in our house.

But I did find some hairspray.

Tuesday
Jun152010

Birthday flapjacks.

Just the other day it occurred to me that I started this blog a year ago.  A year ago today, in fact.  Grand plans for a special post would have been nice.  But really, what I generally do to celebrate is bake something special.  So today we had flapjacks.

Have you ever had flapjacks?  And I'm not talking about pancakes called flapjacks.  I'm talking about British Flapjacks.  A British co-worker introduced me to them forever ago and I instantly fell in love with the buttery, carmeley treat.  I hadn't thought about them in years.  But when I saw a recipe in my March Bon Appetit magazine (the article is a fun read as well), I knew I'd have to give it a go.  And today I made them--my kind of celebration, for sure.

The ingredients couldn't be simpler (but one ingredient might require a bit of a search):  unsalted butter, brown sugar, quick cooking oats (I used old-fashioned as that's all I had on hand), a pinch of salt, and golden syrup.  I found the golden syrup at Wegmans but not at my other area supermarkets.

You melt the butter, syrup, and brown sugar until everything is nice and gooey--a heavy bottom pot comes in handy to avoid overheating.  Next, you add the oats and salt, press into a pan, and bake untiil everything is nice and crusty.  Waiting for the flapjacks to cool is the hardest part...the aroma it gives off while baking is amazing.

Actually, I didn't exactly wait for them to cool and set up before I dug in.  And I'm okay with that.


A few notes:  the boys looooooved these.  Not a huge surprise, really, as they love oatmeal baked goods with a passion.  I envision lots of concoctions with their favorite add-ins--coconut, nuts, dried fruit, anything along those lines would work very well. 

Even after our flapjacks cooled completely, they were pretty crumbly.  I have a feeling it has to do with using old-fashioned oats instead of the quick-cooking variety--next time I'll stick to the recipe and compare.

Now, back to the year-old blog...I am very happy I started this little project a year ago and am determined to keep it up.  But I do have some thoughts and plans that I will share soon...nothing major, just some goals to help me get more done.  Here is my original post--the year went by awfully fast if you ask me.

xoxo, Sandra 

(flapjacks recipe after the jump)

Click to read more ...

Sunday
Jun132010

Catch up.

I know I need not tell anyone else who has a children-centric schedule how there are some weeks that whiz by impossibly fast.  The kind that during the week, you do not know if you're coming or going and there are just too many things written down on the calendar.  In pen.  And yet, when you finally sit down at the end of it all, you cannot--for the life of you--piece together the blurry bits to figure out what, exactly, you did.  Of course, what you did not do (ahem, laundry...blog posts...weed the garden) is plainly obvious.

And so, since I am playing catch up all over the place anyway, here is something I meant to post.  It is a dresser I recently refinished.  It used to be my brother's--the ubiquitous shelf/dresser combo that every boy had growing up.  It matched his bunk beds.  And I'm pretty sure it was standard issue during the late 70's...boys got these sets and girls got the frilly canopy set (mine was painted cream and yellow, I think, with touches of gold).

When my parents moved last summer, I saw the dresser sitting in their garage and I asked if I could have it.  They were more than happy to oblige--my brother did some serious damage to it! 

My original plan was to paint it a fun color for William's "big boy" room.  But as we were sprucing up the living room for my brother's party, I thought it would make a nice beverage center.

I don't have a real before picture (specifically, I failed to capture the dated brassy hardware and scallop trim--Charlie just hacked away anything too "country").  But here are some shots I took during the sanding and wood-filler process, which was fairly painless (despite my brother's heavy hand at carving his favorite band's name all over the wood.  Really, John?  Really??).

And here it is after three coats of Rust Oleum Ultra Cover in Navajo White, plus new hardware.  It took three (!) cans of spray paint--thank goodness I picked up a reusable "spraygrip" attachment for the cans.  I also used a couple coats of hi-gloss wipe-on poly.   

I removed the middle shelf to make it look more like a hutch.  And I may eventually paint the back a different color.  But for now, I just propped up a print we like and stocked it with everything we need for impromptu entertaining.  I just love how it turned out. 

cheers, Sandra

*I'm linking up over at...