Shop Duck Duck Wool

Where was that?
Updates

Enter your email address:

Delivered by FeedBurner

Look around
Pumpkins One, Two, and Three (and Me)

when I started the blog...

and a few years in...

and now...

3pumpkinslittle on Instagram 


Entries in crafts (117)

Sunday
Jun132010

Catch up.

I know I need not tell anyone else who has a children-centric schedule how there are some weeks that whiz by impossibly fast.  The kind that during the week, you do not know if you're coming or going and there are just too many things written down on the calendar.  In pen.  And yet, when you finally sit down at the end of it all, you cannot--for the life of you--piece together the blurry bits to figure out what, exactly, you did.  Of course, what you did not do (ahem, laundry...blog posts...weed the garden) is plainly obvious.

And so, since I am playing catch up all over the place anyway, here is something I meant to post.  It is a dresser I recently refinished.  It used to be my brother's--the ubiquitous shelf/dresser combo that every boy had growing up.  It matched his bunk beds.  And I'm pretty sure it was standard issue during the late 70's...boys got these sets and girls got the frilly canopy set (mine was painted cream and yellow, I think, with touches of gold).

When my parents moved last summer, I saw the dresser sitting in their garage and I asked if I could have it.  They were more than happy to oblige--my brother did some serious damage to it! 

My original plan was to paint it a fun color for William's "big boy" room.  But as we were sprucing up the living room for my brother's party, I thought it would make a nice beverage center.

I don't have a real before picture (specifically, I failed to capture the dated brassy hardware and scallop trim--Charlie just hacked away anything too "country").  But here are some shots I took during the sanding and wood-filler process, which was fairly painless (despite my brother's heavy hand at carving his favorite band's name all over the wood.  Really, John?  Really??).

And here it is after three coats of Rust Oleum Ultra Cover in Navajo White, plus new hardware.  It took three (!) cans of spray paint--thank goodness I picked up a reusable "spraygrip" attachment for the cans.  I also used a couple coats of hi-gloss wipe-on poly.   

I removed the middle shelf to make it look more like a hutch.  And I may eventually paint the back a different color.  But for now, I just propped up a print we like and stocked it with everything we need for impromptu entertaining.  I just love how it turned out. 

cheers, Sandra

*I'm linking up over at...

Monday
May242010

Easy top to skirt refashion.

A few weeks ago, I ordered this top from Tulle.  It was during one of their Tullesday events, so I think the top cost $2.99 or something.  I am not kidding when I say that 50% of my wardrobe comes from Tullesday sales.  Impeccably crafted lined coats that normally sell for $80...but on sale for $5.99?  Yes, please!  I especially love their little cropped jackets--I pop one of those over whatever wreck of an outfit I'm wearing and poof!, I can trick most anyone into thinking I am pulled together. 

I had a feeling this top would be a bit clownish on me and I was right.  But I've wanted a modish, circle-neck tunic pattern for a bit, so I figured at the very least, I could draft a sewing pattern off of it.  And I actually like the print of the knit.  Just not as a top. 

I used my trusty seam ripper to unpick the neckline and then cut across the remaining tunic piece to even it up into a rectangle.  I folded over the raw edge to make a casing for some elastic and I was done.  I think it makes a fun, summery skirt.  I pretty much live in skirts during the hot weather months, so I know I will wear it.  Next up is to reuse the neckline with a more subdued knit for the tunic.  I'm loving gray + yellow right now so am keeping my eyes open for something inspiring.

not sure what happened to my settings on this photo...sorry it's so grainy

cheers, Sandra

p.s.  linking up to DIY day at A Soft Place to Land.

p. p. s.  Tullesday happens the first Tuesday of every month.  Some months there are plenty of scores, some months, nothing.  But it's absolutely my favorite place to stalk for a bargain (assuming you like mixing in Anthropologie/vintage-y pieces.  I happen to really love that look).

Friday
May212010

Hello yellow.

As I mentioned, the week or so leading up to my brother's surprise 40th birthday was, as I like to call it, full.  Charlie has another name for it--he calls my pre-party crunch mode 'FLAIL EX'.  I have no idea if that's how he would write it but it's a military thing to put 'EX' behind something, standing for exercise.  I am getting the feeling that this is not translating well, but believe me, it's funny when a Marine says it (unless, of course, it's said during FLAIL EX).

So back to the crazy week before the party.  I decided we needed--and I do mean needed--a nice sized table to set up an appetizer station.  I was determined to make people mingle, after all, most would not have their children hugging their legs like a koala pencil-pal.

Hello 5th grade--remember these? Image from Giggle Time Toys.

(We interrupt this post with an important aside:  I have always wanted to dress up for Halloween as a pencil, with our toddler dressed as a koala hugging me.  I have yet to actually do it.  Could someone else, please?) 

Since a new table was not in the budget, I went scrounging in the garage and happily unearthed an old patio table bought in my apartment days.  For the last few years it has served mostly as a surface for DIY projects.  And it had the paint splotches, burn marks, and gouges from the hacksaw to prove it--not pretty.  But after some elbow grease and a couple coats of Rust Oleum Ultra Cover Gloss Sun Yellow, it was more than presentable.

I have no pictures of the staged room to share; isn't that sad?  But here's one with some half empty trays of appetizers (the biggest hit were the gorgonzola stuffed apricots wrapped in bacon--yum).

Once I introduced the yellow (which I picked because I have lots of pretty bowls, service ware, and linens in yellow), I decided that the rest of the room needed a dose of it, too.  So I whipped up some pillows.  And I should probably mention that my 'must have yellow' moment came to me the night before the party.  If you have ever witnessed FLAIL EX, you saw that coming.

The trick to pillows, generally, is to make them the same size as your form, otherwise you get a slouchy pillow.  But the trick, specifically, to churning out five pillows in less than an hour and a half is to be flexible.  The bow tied around the round pillow happened because my free-form circle was anything but round and I went with the ruched pillow because I was too lazy to get up from my sewing table and remeasure the rectangle form.  I of course now pretend that both of these details were by design.  Also, decide whether you want matchy-matchy or coordinated but asymmetrical.  Since I have three boys who think throw pillows are named as such for a reason, I went with the asymmetrical look.

William obviously approved of the yellow. 

Happy Friday!

xoxo, Sandra


Thursday
May132010

Train love.

Another thing that added to our very full weekend was a birthday party for my dear friend's son, Elliot, who turned 3.  He had a train party, which is always a hit with my boys.  I think we did trains for one of Max's school parties and another may be in our future because of William--he is suddenly very into all things Thomas the Tank Engine.  He was in pure heaven at the party.

For the gift, I was tipped off as to which Thomas trains were missing from the birthday boy's collection.  And to make it more fun, I decided to make a coordinating bag.  I ended up slip covering a canvas tote with some Thomas fabric and added a patch to clue everyone in on what's inside. 

I hear it was a hit!

And speaking of hits, the boys loved the train ride at the party.

Though the older boys got a bit nervous riding in the seat by themselves--they held hands during the entire ride...


And William got a bit grumpy when I got up to shoot a few shots, but got over it as soon as I sat down and he heard the whistle...

Thanks for a fun morning Elliot (and family)!

xoxo, Sandra

p.s.  And thanks also to Elliot's folks who made it to the surprise party for my brother later that night at our home.  Kristin has known my brother as long as she's known me (good grief, is it 25 years??!!!) so naturally she and her husband were there.  And whenever we get together, we have fun!  A friend posted this shot of us on facebook so I downloaded and tweaked it vintage style.  I think I used just about every effect Picnik offers...

Friday
Apr302010

Spring top.

I told myself I would sew a top and enter the Spring Top Challenge hosted by the wonderful Made by Rae.  Well, at 10 o'clock last night, I figured it was now or never because entries were due by today.  I wish I hadn't waited until the last minute--when I don't have time to plan out a sewing project, it always ends up so slap-dash.  But in the interest of 'keeping it real', here's what I whipped up.  

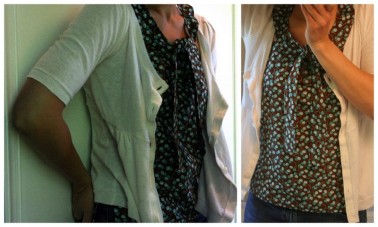
I made all sorts of mistakes.  First, I only have cotton in my stash.  This particular cotton doesn't really drape so this top could hang tons better.  Or, you know, at all, instead of poofing out and adding a solid inch of circumference girth.  I didn't have a pattern so I just winged it and went with a simple circle neck--but to make it a little different, I added a few pleats to give it a slight ruffle.  I also wanted a tie-neck because my intent is to mostly wear this as a shell under cardis.

So am I entering it?  Yes.  Even though I'm a little sheepish about doing so--have you seen some of those tops??  Swoon.  But I'm doing it because a) it was a goal, and b) I believe part of the spirit of the challenge was to motivate some of us who semi-regularly sew to actually sew for ourselves (I think many crafters craft for others).  And you know what?  After this, I may indeed have a bit of the "selfish sewing" bug.  Also, I think I will wear this top--it's not so home-ec that I'm too embarrassed to, so that's good.  But I'm ordering Cal Patch's book asap.  And I think a dress form just got bumped to the top of my wish list.

Here it is under a cardigan...I like it styled this way best.

And because I think nothing screams high-fashion like a photo shoot in the bathroom without a stitch of makeup or your hair brushed--but hey, there's better light--I feel compelled to leave you with these.  I'm sorry.

Happy sewing and happy Friday!


Wednesday
Apr282010

Cake pops roar.

Have I ever mentioned how much Leo loves lions? Well, he does. I suppose if parents choose to name their child Leo, you’ve got to see it coming…  

And so I knew lion cake pops were in order for the birthday boy’s school party yesterday. They were very fun and easy to do. I dipped them in yellow candy coating (then tried to make them textured a bit to look like fur, which only sort of worked), used chocolate for the mane, cheerios for the ears, a red sprinkle for the mouth, and red jimmies for the nose (originally bought for the Rudolphs but they ended up being too small).  

It made Leo very happy.


More cake pop posts here and here.  And here--yes, I need an intervention.  Actually, I just found out that the grown up party we’re hosting in a few days may include some younger guests (babysitting woes, you know how it goes...), so more cake pops may be in my near future.  Everything is more fun when you stick it on a stick, don’t you think?


DIY Day @ ASPTL


Wednesday
Apr142010

Fun experimenting: iron-ons from plastic bags.

Did anyone else immediately move Filth Wizardry's recent tutorial to the tippity top of their 'must-try' list?  I was staying off of most craft blogs last week because I was trying to get things done for the boys' party.  But then my friend sent me a link and I just had to peek--because it was for DIY iron-ons!  I did manage to wait until the day after the party before I tried it.  And yes, such restraint was hard for me.  I'm just not a particularly patient person.

For my first go, I decided to embellish a kitchen towel.  I figured it would be a good test on how it holds up in the wash.  Go to Filth Wizardry's genius site for the full tute.  But here's my shorthand version:

First, I asked Leo what home meant to him.  He said "love."  That boy can melt me, my goodness.  We wrote it down, then I reverse-traced it with a red sharpie onto a scrap of plastic (a ziploc plastic bag).

I placed it on the kitchen towel, covered it with parchment paper, and ironed it with a hot, dry, iron.


It took a fair amount of pressure to make it adhere, especially around the edges.  But adhere it did.  And I really liked how it turned out.  We'll see if it holds up!

I then decided to try out some other plastic packaging...


Totally cheesy design, I know.  But I really don't have much plastic to pick from around here (these scraps were left over from water bottles bought for the boys' party).  Cannot wait to experiment more--stay tuned.

Monday
Apr122010

Birthdays 2010.

The boys' birthday party was yesterday and it was a lot of fun.  We've never before held it outside of the home--definitely a new experience.  It takes A LOT of planning to make sure you haul everything with you.  But the zero post-party clean up was awesome.  Really awesome, actually.  And so I'm on the fence as to what we'll do next year.  Luckily, the boys have a year to decide--a fact they are none too happy about ("a whole year momma?").

The mini-theme I alluded to was 'spring'.  Not much of a theme, I know.  But we are planting a garden this year (Charlie just finished the raised garden bed!  More on that later...) and the boys are pretty excited.  So I made dirt cupcakes with mini shovel toppers.  To make the shovels, I assembled two types of pretzel bits to fashion a handle and used a cinnamon toast cereal bit for the blade.  It sort of worked...

Many shovels broke en route to the party, grrr.  The dirt cupcakes also sported sprinkles for 'seeds' and lots of gummy worms...

And because I was not 100% sure that the cupcakes looked even remotely like what I was shooting for (little garden plots), I put out a sign to hopefully clue everyone in...


For the favors, the boys helped me put together planter buckets.  We found tins in the $1 section at Target and we punched drainage holes in the bottom.  We threw in some rocks, bags of potting soil, and rounds of seed blanket (a butterfly garden mix that we cut down to size.  Found it at Home Depot--really hope it works!).


To top off the instructions on how to plant the seed blanket, I put together a "photo strip" of the boys with a little message (idea from Young House Love).

Once everything was assembled, I realized that some kids might be let down that there was no candy.  Specifically, my kids.  So I caved and added some gummy worms.


At the party, which was held at The Little Gym, the boys enjoyed stretching their muscles and running around like crazy ("run inside, mommaReeeeallly?!").


I completely forgot to take pictures of the decorated party room, but the background in some of the shots reveals that  the bunting did indeed make it.  Bunting makes me happy. 

And every year, after the party, I am reminded of a certain quote.  Some of you quote wise, historic figures.  But my mind holds onto quotes like these:  from over a decade ago, when my law school roommate, Jenn, and I were watching a Letterman interview with Janeane Garofalo (remember her?).  And in discussing her recent and significant weight loss, Ms. Garofalo revealed that her weight was a constant battle because she often "disguises the sin of gluttony in the nobility of not being wasteful."  Amen, sister.  I have more than a dozen cupcakes left over from the party.  And being wasteful is a terrible thing...


p.s.  I'm linking up to DIY Day over at A Soft Place to Land

Friday
Apr092010

Reverse applique, birthday shirts.

I finished the boys' birthday shirts today.  I used some coordinating tees and went with reverse applique.  I've previously posted on how I sometimes use phonebook paper for more detailed appliques when I'm too lazy or rushed to cut out detailed shapes.  But with simple shapes and numbers, here's how I do it.

First, I head to my computer and use a word processing program to pick a font that has nice clean lines (so it won't be fussy to sew around).  I scale it to the size I want by playing with the font size and bold option.  I print it and cut out the number.

Next, I turn the t-shirt inside out and pin my contrast fabric to the area I plan to embellish.  I then just tape the number down to hold it in place.  

I sew a smidge outside the paper template...


...then trim and cut the t-shirt fabric away from the top to reveal the applique. 

I then repeat two more times because Charlie has not yet taken over dressing the boys to "man" things up a bit.  I think I have a few years before that happens.  Or roughly three more outfits where I use turqoise--whichever comes first. 

I think the boys will look nice in their special bday tees at their no-themed-party party*.  I'll try to get some action shots.  Because let's face it.  I do these primarily for the photo op.  Happy Friday!


*Incidentally, I just might be sneaking a wee bit of a theme into the no-themed-party party.  And I am well aware that this will shock exactly no one.   

Wednesday
Mar032010

Sundress to apron refashion.

After I made the apron for the auction, I was pretty gung-ho to make one for my very own.  Until I faced my carefully curated stash, that is.  Because then I plain out froze.  Deciding which fabric combos to cut into may take some time--I've hoarded some of these prints for years and I love them.  And, yes, I do mean love/love, not just like/love.  So until I decide, I thought I'd do a quickie upcycled version.      

I found a decent looking sundress at the thrift store for only $4 (my favorite thrift store has a 50% off sale fairly regularly, which is when I try to load up on refashioning materials).  The cut and size of the dress fit me well enough but I don't think it's essential considering how much is eventually cut off.  And as I didn't even like/love the hibiscus print, it was the perfect piece to experiment with.

I cut off the straps and the side seams to create a front panel...  

...then straightened up the sides into an A-line shape.  I left the bodice top at the full width because I knew I wanted to ruffle it.

Next, I cut up some cotton lining remnants from my stash for the sashing/ties.  Unfortunately, I didn't have long enough pieces so some patch-work was necessary (which made the entire project more fiddly than I expected)...

The construction and sewing process was completely done on the fly.  I wouldn't call it terribly efficient--working from a pattern turned out to be easier.  But this was definitely faster.     

The end result?  A definite meh.  It's just okay.  I don't love it but do think some cute pockets would really help, so on they will go.  Someday.  The biggest hassle was the side sashing done without the benefit of a pattern.  Should I attempt this again, I'll just do a simple, continuous, sash at the waist and ties that attach to the top.  

But all in all, it is still a lot prettier than the other aprons currently hanging in the pantry.  Those were accumulated mostly by way of freebie promos, so you can imagine.  And I also keep reminding myself that it'll be covered in marinara sauce or brownie batter splatters within 24 hours.

I was happy to have a reason to test out my new tripod.  I will work on lighting next, promise.  Leo was absolutely fascinated with the auto shoot process.  And he couldn't resist sneaking in for a little smooch.  My goodness, does he ever have my heart in such a special way.  Leo is my love bug. 


Page 1 ... 6 7 8 9 10 ... 12 Next 10 Entries »