Shop Duck Duck Wool

Where was that?
Updates

Enter your email address:

Delivered by FeedBurner

Look around
Pumpkins One, Two, and Three (and Me)

when I started the blog...

and a few years in...

and now...

3pumpkinslittle on Instagram 


Entries in Christmas (11)

Wednesday
Dec282011

Christmas, 2011.

How was your holiday?  Fabulous, I hope.  Ours truly was.   

The boys have been so wonderful, I can't stop squeezing them.  They tell me I can always hug them tight no matter who's looking or how big they get.  I intend to hold them to that quite literally.

There are still new toys strewn about.  No one can bear putting them away, including me.  Besides, I need to figure out how half of them work before the older boys go back to school and littlest one looks at me expectantly.  Although I should point out that we didn't go all high-tech this year.  Lots of new board games for the game cupboard.  Just in time for winter, thank goodness. 

Here is our Christmas card for 2011 (though on the real version our last name is included).  I did it on Mixbook, which took over Scrapblog (the company I used in 2010 and 2009).  If you click on the thumbnail, you should see a full-size image.  The photo outing was rather painless, though I must remember to share the out takes to reveal the true goofy nature of the shoot. 


I've been taking it pretty easy this holiday.  And it feels ridiculously indulgent.  There has been some knitting, lots of baking, and even some furniture refinishing I will post about.  But not now.  Now is for hugs and empty laps to fill and tummies full of cocoa and jammies until noon.  As Leo said, "this is the life." 


May you enjoy this special time of year as well.

Sandra

Wednesday
Jan192011

No really. Happy New Year.

"I feel pretty lucky, though, because it looks like no one else caught my Christmas cold."

And that, of course, was a foolish, foolish thing to say to a friend last week.  Because not twelve hours later, I got the dreaded phone call from the school nurse.  I will not bore you with the details; I'm sure you know how it is: kids fell like dominos...too much couch time, leading to sleepless nights...a home filled with heart-wrenching coughs and whimpering.  All of this delivered with a side of grumpy, because this particular virus lasted so very long. 

I should have seen it coming.  Last week was impossibly full, schedule-wise.  And if your life is anything like mine, the crazy weeks--when you don't have time for sick days, school delays, school closings, ice storms and power outages (because, yes, all those happened this past week)--are exactly when they'll pop up. 

So here it is, more than half way into January, and I am just now (!) taking down and packing away Christmas decor. 

Other than the nagging feeling of being behind schedule, I must admit that it's been rather nice having our decorations up longer than usual. 

I did a big purge last year and kept only the things I really love. 

But I have never been so excited to get back on track.  Knocking on wood...knocking on wood...

Sandra

Thursday
Dec232010

Christmas Card, 2010.

We're in the home stretch!  Most gifts are wrapped and tucked under the tree.  Teacher gifts and other small tokens of appreciation were delivered before school break.   And all that remains is some work on the Christmas Eve dinner menu and some more baking for the neighborhood treat platters.  The boys will hand those out later today along with the last few cards to pass out.  And since I know some neighbors read my blog--I should probably wait to post our holiday card online.  But I'm determined to unplug after this morning and have my sights set on making time to cast on for a last minute knitted gift--so it's now or never, because if you hadn't noticed, loose ends are just not my thing.

So.  Here is our card for 2010, designed on Scrapblog, same as 2009.  I wasn't going to go with a theme for the write-up, but after thinking about our year, couldn't help myself.  Books, books, and more books are taking over every inch of our home.  So it's no surprise what I came up with.  Merry Christmas to you and yours.  I hope it's your best one yet!

Sandra

(click on the thumbnail to enlarge)


Tuesday
Dec212010

Gingerbread decorating party, 2010.


At our annual "gingerbread" decorating party, our day was filled with candy-laden graham cracker houses and bits of frosting everywhere.  This year, I decided to go with traditional royal icing for the mortar rather than the melted sugar like last year

To make house construction go a bit faster and easier, I did two things.  First, I used one cracker for a bottom base, gluing it to the cake board then building the sides around it--it made a huge difference in stability!  And second, I did not make gabled sides...doing those pointy sides always made for dozens of crumbled and unusable crackers.  I wised up this go and simply cut crackers in half for the sides.  I then added a cookie to cover most of the gap.  I thought they looked like wreaths.

We had 37 kids this year.  And as luck would have it, it turned out that the holiday party for my new job was the night before this party.  Charlie and I had a great time at the business party.  But it left me in no shape to get the house ready for our party.  Luckily, no one seemed to mind and my good friends helped shoulder many of my hostess duties.

Notes to myself for next year:

*  First and foremost, do not drink wine hand over fist, no matter how good it is or how fancy the bottle, on Gingerbread Eve.  Just don't do it.

*  The bag of 8 lbs of mixed candy, available at Costco, is a bargain and works great but takes a bit of time to unwrap the individual pieces.  Do it ahead of time--the candies will not stick as long as no other soft candy is introduced to the mix (keep away mini marshmallows and any soft mints!).   

*  Open House style and brunch time worked well as did the simple menu (bagels, salmon, fruit, breakfast casseroles, coffee, cider, and then pulled pork sandwiches for lunch). 

*  Cake pops were probably not necessary as there were plenty of sweets.  But they still went! 

Check out the cake pop stand Charlie fashioned--details to follow...

Every year we wonder whether we'll do it again the next year.  But so far, we don't think the boys are outgrowing it, so odds are we will.  I hope so; I love this tradition.  And I love how proud they are of their creations. 


Hope your holidays are as sweet as can be, too!

Sandra 

Tuesday
Nov162010

Bucilla stocking, no. 2.

At the end of last holiday season, I wrote about Max's Christmas stocking.  It is from a Bucilla kit. 

It has a lot of detail, which is why I love it so much.  It's also why it took a very, very long time to finish. 

Yesterday, I pulled out Leo's stocking kit.  His is pretty fancy, too.  There seems to be an equal amount of hand embroidery--with the added challenge of beaded sequins.  I should have started in October to have a shred of hope of finishing it.  Actually, earlier because as far as I can tell, October lasted about two days.

I know this will not be ready to hang on the mantel the day after Thanksgiving, which is when I start decorating the house for Christmas.  But maybe...maybe...I'll get it done in time for Santa to stuff.  Though I'm not going to lie.  I'm worried, considering this is how it currently looks.


Yup.  Exactly how it looked last season.  Sheesh. 

Sandra

Thursday
Jan072010

Bucilla.

Right about now, during the clean up from massive merriment, I'm pretty much ready to put away the Christmas things until next year.  But there is one item that I usually keep out and move to my sewing room--Max's stocking. 

It is made from a Bucilla kit and it took me quite a bit of time to finish.  I absolutely adore it.  Once I finally hung it on the mantle, Charlie asked, "are you actually going to let Max touch it?"  Hmmmph.  Charlie had sat on the couch next to me for countless nights as I toiled away during TV time, so I guess it's not a silly question.  But of course Max is allowed to touch it.  Carefully.  And of course he'll eventually get it.  When he's married and has a wife who will take care of it. 

I don't put the stocking away for a few reasons.  One, it extends the season a bit, not too much, but just enough.  Also, I want to back it with something more substantial than the flimsy felt that came with the kit.  There is a better chance of this happening if it's out and about (though this strategy has yet to actually work).  And last, hopefully seeing it will motivate me to get going on Leo's stocking.  He has patiently waited and pretended to like his Target stocking just as much as Max's "fancy" stocking for the last two years.  It's pretty pitiful, actually, and he really deserves his own.  And of course there's also Will's.  And maybe, maybe, one for Charlie and myself.  But frankly ours are holding strong in the eventually column.

Have you ever seen a Bucilla kit?  My best friend from childhood got me hooked as she had one growing up, made by a crafty aunt.  And even then, when most high-school girls aren't too impressed by such things, I coveted it very much.  In case you're inclined to give it a go, here is a shot of Leo's kit.  It can be pretty daunting when you get this pile of...stuff...unless you know what you're getting into--and I remember searching the web for info about it with no luck a couple of years ago.

I also remember dumping out Max's kit and muttering something not too very Christmas-y.  *I know I mentioned I cursed during my recent Christmas quilt-a-thon, too, so I feel the need to point out that I actually hardly ever curse (married a Marine--he does it for me), but there are exceptions. 

The stockings I picked were designed for Bucilla by Mary Engelbreit, which surprised me.  Because although I do think her stuff is darling, it's usually not quite my style.  I'm fickle in that I like country stuff but only in certain ways and in little doses.  And it's really more cottage style that I like, think weathered wood, rustic...simple.  My mother sometimes tries to pick up things for me thinking I'll like it because it's "country" but I tell her, "no, that's country chicken and I don't like country chicken."  Unfortunately no one really understands what I'm trying to distinguish between so I sometimes end up with gifts with miniature feed sacks in them. 

Okay, back to little Ms. Mary.  Even though I typically don't go for her stuff, I absolutely flipped over the folksy feel of this kit.  With most Bucilla stockings, you do a lot of detail with sequins and beads.  But with the Engelbreit-designed kits, it's all in the stitching.  For instance, the very first bit of embellishment I did was on Santa's boot--two colors of thread twisted to make a candy-cane effect for his laces.  And all of the trim on Santa's coat was embroidered...in fact, just about everything is embroidered versus beaded.  Here is a close up of Santa's coat and boots...

and the snow-child's cap...

Oh, and let's not forget the cute dimensional work from the design--the snow-child in Santa's arms is a little stuffie you make then tuck into his arms...

Here is what Leo's stocking will (eventually) look like.  It's another Mary Engelbreit design--wish me luck!


Tuesday
Jan052010

2009 Christmas card.

One of my New Year's resolutions is to be a bit more consistent with my blogging.  And to stay focused on one of the main reasons I began this blog--to try to document this special time in my life where I get to stay home to raise my family and be a full-time homemaker the way I want to do it...the way it feels right for me to do it.  And by that I mean having at least a little time here and there to do more of what I truly love for, and often with, my family, like cook, sew, and craft.  I know that when I had to balance those interests with working outside the home on top of family duties, I didn't get to do them nearly as much.   

The end of my two-year sabbatical from my job is quickly approaching, so there are some decisions we need to make.  But I'm not quite ready to face them yet.  So what better way to make time stand still a bit longer than to look at all the lovely Christmas and holiday cards we received this year.  I've spent the better part of the morning cleaning the house and putting away holiday decorations.  But I paused for a bit as I took down the cards.

I love holiday cards--especially ones with photos.  We display them through out the season and then I move them to fabric memo boards that Charlie made for me in the basement, where we can enjoy them for another year...little hands love to take down the cards to study faces, which may explain this less than tidy display. 

After that, they get placed, grouped by family, in a photo box for safe keeping.  I love to flip through them to see how everyone's children are growing up (too quickly if you ask me).

Here is our family card this year, done on Scrapblog.  Since I'm not the best about keeping up with my scrapbooking, as a compromise, I like to write a snippet in our cards of what the boys are up to.  I hope to present each of our children, someday in the far future, with a collection of Christmas cards that chronicles much of their childhood quirks.  I'll dig around for our cards from prior years and post those too--I try to do a different theme each year.  This year I came up with playing off an instruction manual of sorts...I'm starting to run out of ideas!  (click on the thumbnail to enlarge)...


I hope you're having a wonderful start to 2010--just three more weeks or so until I naturally write the correct year when I'm dating something! 


p.s. I do love how the holidays live on a bit in blogland with everyone's show and tell debrief, don't you?  And if you in fact don't, you might want to skip my next few posts as I'm sure that's what I'll be up to too :)...

Monday
Jan042010

A keepsake quilt.

I've wanted to make a special Christmas quilt for my mother-in-law for a very long time.  I actually bought the fabric for it when I was pregnant with Will two years ago.  Since she is a mother of all boys (and her two boys have all boys!), we have a lot in common.  Specifically, I know what it's like to live in a house where the majority of the occupants don't get all worked up by the nice linens and other whatnots that adorn their home.  It's a big deal when my MIL or I visit the other's house because when we haul out our pretty kitchen and bath towels, for once, someone else notices.  So I wanted to give her something pretty.

I also wanted to make her a quilt because, quite simply, it's hard to express just how grateful I am to the woman who gave me my husband, and in turn, my family.   

So this year, when a blizzard came to town the weekend before Christmas, I decided not to freak and fret over the snowed-in weekend and no-go errand runs.  Rather, I tallied up the suddenly free hours from two rescheduled Christmas parties and had a crazy thought.  While the older boys played outside until they were blue... 

I found my stash of fabrics...

and cut and sewed and ripped out stitches and cursed and sewed some more...

I decided on a crazy quilt because I didn't have time to plan any blocks.  Morgan's quilt for her newest little one, over on One More Moore, provided the inspiration for the design.  I just cut the fat quarters into 2 1/2 inch strips, then sewed three different strip patterns together.  I then cut the pieces into 6 1/2 inch square blocks and pieced them together, alternating their orientation.  I originally planned to make the quilt the size of a throw, but Charlie convinced me that that's basically a useless size for snuggling on the couch because throws can keep a full-sized man's upper or lower body warm, but not both.  Noted.  So, to increase the size, I added a border of white and made some blocks for the corners.  It was all done on the fly and I'm sorry that there are no pictures of that--sort of short on time as it was--but here is the finished quilt top.

I continued to de-stash by piecing two fabrics together for the backing and used some store-bought tape for the binding--which I sort of hate but whatever.  I almost went through the roof when I came up four inches short of completing the binding.  Seriously, four inches.  And in case it's not obvious, that is when the cursing occurred.

Luckily, after my in laws arrived on the 22nd, I was able to pop into Joanne's to pick up another pack of binding to covertly finish the quilt after everyone went to bed on Christmas Eve.

Here is a shot of the backing.  You can see that I just quilted in the ditch--practicing free-motion quilting is on this year's to-learn list as I have no idea how some of you do such a lovely job of it!  I used organic cotton batting and made sure to prewash my fabric, but not the batting, so that when I washed the completed quilt, it would get all wrinkly and yummy. 

In the corner, I placed a little poem that Charlie helped me write.  To print it on fabric, I ironed white cotton fabric onto freezer paper, then cut it down to 8 1/2 x 11 inches so it would feed into our ink jet printer.  I printed the wording directly onto the fabric and heat set it with my iron.  Before turning it into a patch for the back of the quilt, I prewashed it to check for color-fastness.  I was very happy to find it held up perfectly in the wash. 

My mother-in-law absolutely loved the quilt and I was so happy we could be with her the year we gave it to her!  This was the largest quilt I've made to date...before this attempt, I'd only made a handful of baby quilts.  But now I think I'd like to make quilts for the boys' beds.  And I fully intend to give myself more than a few days to do it!

ETA:  I'm linking up to Kimba's DIY day here.


ETA:  I'm linking up to Kimba's DIY day here.

Thursday
Dec172009

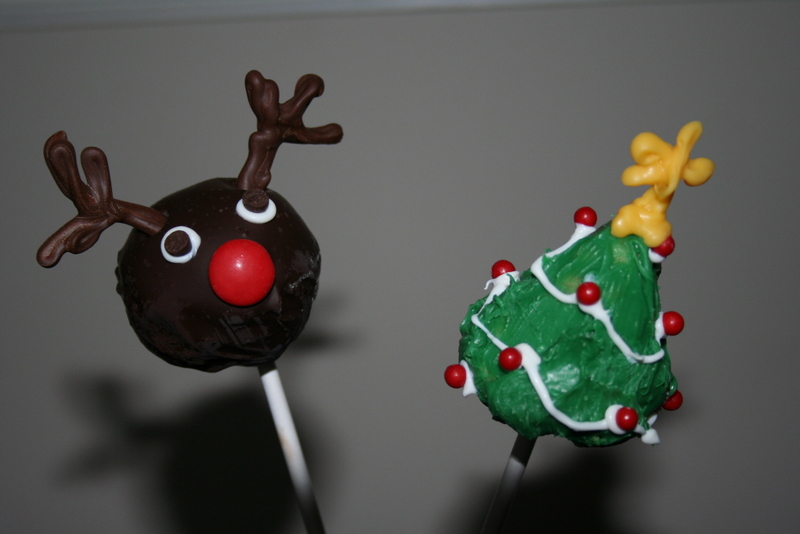
Rudolph and Christmas Tree cake pops.

I made these for the kidlets "Gingerbread" House decorating party.  The kids loved them.  Most of the grown ups did too.  In fact, I'm pretty sure I remember one mom refusing to share her tree pop with her adorable children because they already had theirs.  I won't name names but you know who you are.

If you've never made cake pops before, be forewarned that once you do, you'll be hooked.  You'll start looking for all sorts of reasons to make them.  Flag day?  Cake pop.  Kid stubbed a toe?  Cake pop.  They're a bit of work, but worth it.  When I make a batch, I usually also make an extra batch and freeze them undipped (yes, I freeze everything).  So right now I have two dozen naked cake balls waiting to be dressed for Christmas.  We'll do more Rudolphs and trees, and I'm also thinking of doing a Santa and some angels.  I also might make them for our neighborhood New Year's Eve progressive dinner party...but I need some ideas.

Check out the how-tos over at Bakerella, who started the phenomenon.  She gives you directions on how to use a box mix and store bought frosting.  I personally think they taste better with homemade cake and frosting but will admit, the cuteness factor is what makes them special.  One thing to note, however--if you do go homemade, make sure you use a frosting that can be left out at room temperature, i.e. doesn't require refrigeration.  Some brands of dipping chocolate recommend you don't refrigerate and since these hold fine for a few days (I've gone up to 5) at room temperature, that's what I do. 

ETA:  I wrote some details as a response in the comments section, so be sure to check there for more tips...

Tuesday
Dec152009

Well hello there.

Hiya.  Blog much?  Didn't I mention I was going to take a wee break during the holiday crunch time?  Oh, right.  That's because it wasn't exactly planned.  Let's just say I'm tired of the rousing game of duck duck cold we've played these past couple of weeks.

Looking on the bright side, I sure am happy that the bitty bouts of sickness seemed to pop up between activities and special days.  Shockingly, everyone was in good health, and even better spirits, for our annual kid's "gingerbread" house decorating party.

I use graham crackers instead of baking gingerbread and sugar "glue" to pre-build the houses.  I learned last year that using royal icing for the mortar wasn't strong enough for excited little hands.  So this year I went with the heavy duty stuff--melted sugar.  I got the idea from the December '09 Better Homes and Garden magazine.  It really is stronger and, as an added bonus, it's a lot faster if you're building, oh, a gazillion.  You just melt some granulated sugar in a heavy bottomed pan (I use my enameled cast iron) then dip the edge of your graham cracker in it, then join with another cracker.  Be careful--this is definitely not a step for the munchkins.  For clean up, let your pot soak in hot water to dissolve the sugar.

Another important thing I should point out--unless you are very careful about how far you let the sugar carmelize (and you can see from the above photo that I was not), it won't taste good.  In fact, it tastes pretty awful because burnt sugar tastes pretty awful.  It's no problem for us because the houses are merely a prop for the pounds and pounds of candy they support.  And also, the kids don't eat the houses because these things sit around until after Christmas and get pretty stale.  I do, however, let my kids pick a candy or two off every now and then.  Okay, daily.

Here's a photo montage of the basic assembly process--I think it's pretty self explanatory.  Some tips:  when creating the gable, use a serated knife and gently saw back and forth.  Also, if crackers break (oh, and they will) set aside the pieces to doctor--just dip in the sugar & glue back together and lay aside until it sets up.  Don't stress about making these look perfect.  They're kind of cute crooked.  And kids love crooked. 

A few other things we like to do for the party:  cut down cardboard boxes (you know, all those you're getting daily from Amazon right now.  Right?  No?  Oh--it's just me?  Fine.) and cover with foil to make freebie cake boards for each party guest to tote home their masterpiece; ask guests to bring a bag of candy to share for decorating; make individual frosting piping bags by putting a big dollop of frosting into sturdy ziplocs and either tape or rubber band them right above the frosting to assist little hands with applying pressure while squeezing; and use colorful cereal to inexpensively round out the candy supply--especially great for walkways and "stone" accents.

But most of all, have fun.  Even the youngest of ones will actually sit still and do this activity with some help--we were so amazed at little Will's efforts!  All the kids did great.  We had over 25 taking over the kitchen and the house decorating portion was certainly the quietest time of the entire party.  Here's to making memories...


p.s.  Get more DIY ideas here.