Shop Duck Duck Wool

Where was that?
Updates

Enter your email address:

Delivered by FeedBurner

Look around
Pumpkins One, Two, and Three (and Me)

when I started the blog...

and a few years in...

and now...

3pumpkinslittle on Instagram 

  
Wednesday
Mar172010

Squeek WorryWoo and a give away.

**ETA:  Give away is closed.  Will post winner shortly**

A few weeks ago, I received a lovely surprise.  It was an email from the creator of the WorryWoo Monsters series, Andi Green.  Andi happened upon my previous post about Max and Leo receiving (and loving) Nola, the Monster of Loneliness, and Rue, the Monster of Insecurity.  She contacted me and offered to send us the newest little monster to review.  And even though I don't really do reviews on this blog, I happily said yes!

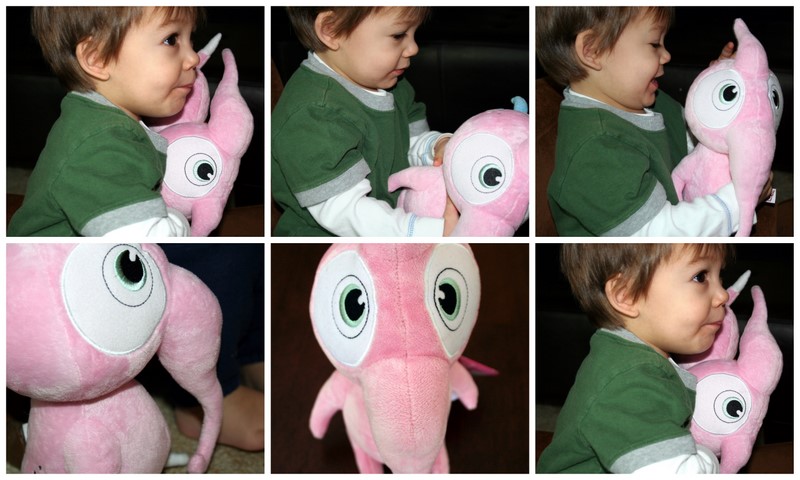
A few days later, Squeek, the Monster of Innocence, arrived.  His hangtag told us that Squeek "is a cotton candy pink little guy who is scared to leave his bubble.  As you can see by the look on his face he is very shy.  Will you be his teacher and introduce him to all the fun things that are special in your life?  Oh, and don't forget, he's the pip-"squeek" of the bunch so be gentle!" 

The older boys were instantly smitten with Squeek and decided they should care for him until Will was old enough to do so himself.  They even constructed a schedule of who got Squeek when.  This ploy has worked on other gifts that were technically for Will, so I didn't blame them for trying.  But Will had other plans for Squeek.  Perhaps he picked up on how much his older brothers coveted him.  Or maybe he just didn't want to stop touching his soft, plush fur.  Unclear--but whatever the reason, Will staked his claim to Squeek immediately and has snuggled up to him ever since.
As I previously mentioned, one of the reasons I love the WorryWoo Monsters series so much is that they make great gifts for boys who like stuffed animals--especially older boys.  There's really not much out there for that.  I suppose it's because most folks think that boys outgrow "dolls".  But my older boys still love stuffed animals.  They pile them onto their beds and dive into them at bedtime.  And when I peek into their room at night, I find stuffies tucked into every crook and cranny of their arms and legs. 

They also use their stuffed animals to put on elaborate shows, full of dialogue and props.  And I really love seeing them take care of their dolls--though that statement may be a tad misleading.  They are boys after all.  And so some stuffie tossing or dragging goes on.  And on and on.  But they really do take care of the little characters that they've attached to each stuffie.  Leo props up his lions onto couch pillows to make sure that they can see the books we are reading.  Max will make sure his beloved dogs have blankets to snuggle with while he's at school.  And If Will is fussing, the older boys rush to give (and by 'give' I mean hurl) various stuffies at him to make him feel better.  It is both amazing and endearing to see how their stuffed creatures bring out their nurturing side.    

And so Squeek could not be a better fit for our family.  He came with a well written and beautifully illustrated hard cover story book to tell his tale about exploring new things outside of his safe bubble.  My boys love the three WorryWoo stories we have--they are often the requested bedtime book.  The stories are simple enough to keep their attention but so imaginative, each with a unique "embrace your emotions" message. 

In addition to how great I think the products are, I was truly impressed by Andi when she approached me.  Why?  Because my blog is little and I don't do product reviews.  And Andi's products are receiving much praise, toy awards, and other national recognition--you can read more about it on the WorryWoo website.  And yet Andi was kind enough to send my little guy his very own WorryWoo to try out.  After a few emails with her, I was left with the impression of an artist who sincerely believes in her products and gets a kick out of kids enjoying them.  I suppose I should not be surprised by Andi's refreshing and personal approach to growing her business.  Because once you happen upon the charming monsters and their equally charming tales, you realize that a very special person must be behind them.  I wholeheartedly endorse the WorryWoo Monster products.

Now on to the give away!  Andi is generously offering a Squeek story book and plush doll to one of you.  To enter the give away, please leave a comment.  The give away will close in about a week, at noon, 12:00 pm (EST) on Thursday, March 25, with the random winner announced soon after.  Good luck! 

Friday
Mar122010

A clean slate.

I've begun spring cleaning.  And every year as I clear the clutter a bit, I am struck by how monotone our living room is.  It was never intended.  It sort of looks like I was interrupted in the middle of decorating, right before adding in the personal touches that really make a room.  And of course that's exactly what happened.  But I try to not begrudge my little interruptions.  Especially as I watch them grow impossibly fast.  The room, after all, can wait.  But impromptu hide and seek sessions and tickle monster attacks most definitely cannot. 

Nevertheless, I was still a bit surprised to realize it has been nearly four years since I last thought about "decorating" the room.  And since spring and all the clean corners seem to bring about a certain ambition, I plan to pick up where I left off and finally add a much needed jolt of color by way of some pillows.  And maybe, just maybe, some drapes.   

I will leave up the sheers because I still like them.  They have served us well, despite the torture they endure most days (more on that in a bit).   A friend was over and asked about them, as she was having a hard time finding the right length in window treatments.  When I explained to her what I did she called it clever, so I thought I'd share.

First, to take the look up a notch (literally), I made sure to mount the hardware closer to the ceiling--see that in the picture?  Do not merely mount the rod right above the window.  The trick to making your ceilings appear much taller than they actually are is to mount your rods higher. 

Next, I ordered some semi-sheer tab top panels--from Overstock, I think--in the longest length possible and hung them up.  This allowed me to fold and pin the bottoms in place as I determined exactly where I wanted the curtains to hit (I went for a soft break right at floor length, no trendy puddle).  After that, all it took was a quick zip through the sewing machine over the original seam.  The bottoms are just ironed--there is no stitching.  I really like the detail that the double layer of fabric gives to each panel.  You could also easily add a ribbon or other trim for some color. 

I know that this is beyond basic for many of you.  But I also figured someone out there could relate to needing curtains pronto.  And this method, despite its ease, actually delivers window treatments worthy of hanging up in your grown-up space.  But that minimal time investment also means you won't cringe when you see a little curtain mischief going on.  Actually, make that a lot of curtain mischief...which makes me wonder, do little girls do this, too, or is it just boys?  Or is it just my boys??

I'll post pictures of the revamped room soon.  I'm sure it'll be within the next five years.

Tuesday
Mar092010

Sushi rice salad.

Yes, that's right--sushi salad.  And in case it needs to be said:  Sushi purists--move along please.  Nothing to see here.  But to the parents of young ones who used to go out for sushi once a week but now do not because picking flicked about bits of sushi rice off of lovely restaurant shoji screens does not a nice dinner make--read on.

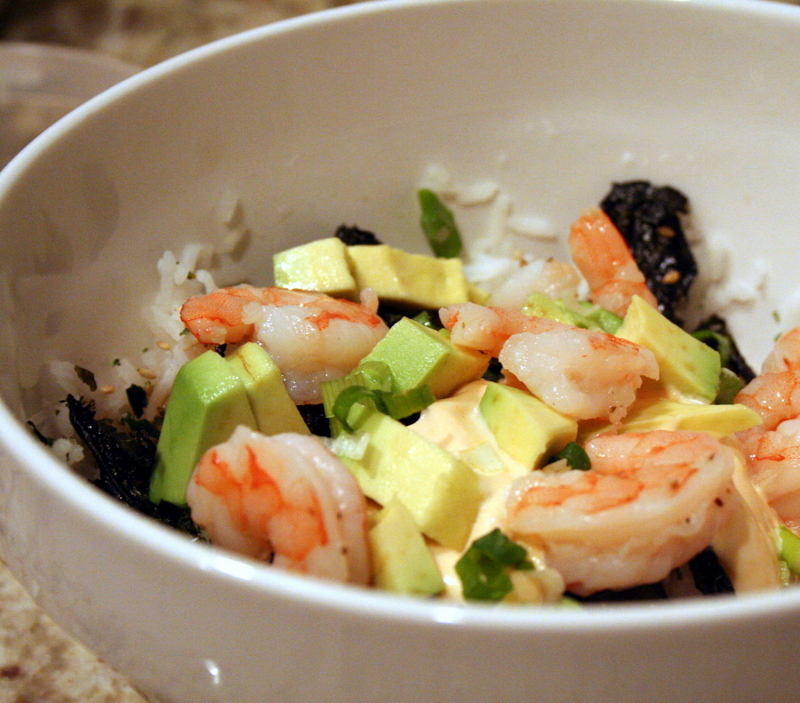
Every couple of weeks or so I make a deconstructed sushi salad for dinner.  It's by no means the real deal but it is enough to satisfy a craving, if you are the sort that craves sushi.  The bonus is it introduces the boys to sushi flavors in a non foreign way--they are used to seeing dinner plates with rice, vegetables, and a protein.  I just don't serve their portions tossed together. 

Sushi Rice Salad

Adapted from Epicurious

Ingredients  

  • 1 1/2 cups short-grain sushi rice
  • 1 3/4 cups plus 1 1/2 tablespoons water
  • 1/4 cup seasoned rice vinegar
  • 1 tablespoon sugar
  • 1 teaspoon salt
  • 1 medium carrot
  • 1 1/4 teaspoons wasabi paste (Japanese horseradish paste)
  • 1 1/2 tablespoons vegetable oil
  • 1/2 large seedless cucumber (usually plastic-wrapped), peeled, halved lengthwise, cored, and chopped (1 cup)
  • 3 scallions, thinly sliced diagonally
  • 3 tablespoons drained sliced Japanese pickled ginger, coarsely chopped
  • 1 tablespoon sesame seeds (optional)
  • 1 firm-ripe California avocado
  • 4 sheets toasted nori cut into very thin strips with scissors (I like to buy the bags of preshredded nori)
  • soy sauce

Extra add-ins we enjoy:

  • cooked protein, such as cooked shrimp or crab/surimi stick
  • rice seasoning (we love fumi furikake)
  • spicy sauce (recipe follows)

Spicy Sauce

  • 1/2 cup mayonnaise
  • 2 tbsp (more or less depending on taste) hot chili sauce, like sriracha
  • 1 tbs sesame oil

Directions

Rinse rice in several changes of cold water in a bowl until water is almost clear, then drain in a colander 30 minutes.  Bring rice and 1 3/4 cups water to a boil in a 3- to 4-quart heavy saucepan, then simmer, covered, 2 minutes. Remove from heat and let rice stand, covered, 10 minutes (do not lift lid).  Note--I just use my rice cooker for the rice.  But I will assume most of you did not grow up in an Asian household (where one learns how to cook rice at such a tender age that it is now possible to do so one-handed, with a baby on the hip).  So the above is what Epicurious says to do. 

While rice is standing, bring vinegar, sugar, and salt just to a boil in a very small saucepan, stirring constantly until sugar is dissolved.  Allow to cool for 2 minutes.

Spread hot, cooked rice in a large, shallow bowl.  Fan to cool slightly, then drizzle with vinegar mixture and toss with a wooden spoon.

Note:  I prep the veggies and protein ahead of time so I can just toss after the rice is prepared.  Shave thin lengthwise slices from carrot with a vegetable peeler, then cut slices diagonally into 1/4-inch-wide strips.  Whisk together wasabi, remaining 1 1/2 tablespoons water, and oil in a bowl, then add rice, carrot, cucumber, scallions, and pickled ginger and toss gently.

Halve, pit, and peel avocado and cut crosswise into 1/4-inch-thick slices.

Place rice in individual serving bowls.  Drizzle with soy sauce of choice (we like the low sodium).  Top with the dressed veggies and any cooked protein, if using.  Top with nori shreds and optional sesame seeds/rice seasoning.  Add a dollop of spicy sauce and top with avocado.  Makes approximately 4 servings.  Dig in!

p.s.  I'm linking to A Soft Place to Land's DIY day...
Sunday
Mar072010

Happy weekend + more cake-mix bars.

Just a quick post to say hello.  I know it was a light week for me blogging-wise.  But for good reason!  I had so much to do before Charlie and I headed out for a quick getaway.  My parents were nice enough to watch the boys so we could take some time to ourselves--such a blessing, I know.  Even if I did overly obsess (yup, again) on having things just so when leaving the boys in anyone else's care. 

I also wanted to share our new favorite way to prepare the cake-mix bars.  These are ridiculously good.  Follow the recipe but add in two handfuls each of dried cranberries and white chocolate chips.  You also might want to squeeze in some extra tummy crunches and salad intake.


I hope you had a nice weekend too--I feel quite restored after ours.


Wednesday
Mar032010

Sundress to apron refashion.

After I made the apron for the auction, I was pretty gung-ho to make one for my very own.  Until I faced my carefully curated stash, that is.  Because then I plain out froze.  Deciding which fabric combos to cut into may take some time--I've hoarded some of these prints for years and I love them.  And, yes, I do mean love/love, not just like/love.  So until I decide, I thought I'd do a quickie upcycled version.      

I found a decent looking sundress at the thrift store for only $4 (my favorite thrift store has a 50% off sale fairly regularly, which is when I try to load up on refashioning materials).  The cut and size of the dress fit me well enough but I don't think it's essential considering how much is eventually cut off.  And as I didn't even like/love the hibiscus print, it was the perfect piece to experiment with.

I cut off the straps and the side seams to create a front panel...  

...then straightened up the sides into an A-line shape.  I left the bodice top at the full width because I knew I wanted to ruffle it.

Next, I cut up some cotton lining remnants from my stash for the sashing/ties.  Unfortunately, I didn't have long enough pieces so some patch-work was necessary (which made the entire project more fiddly than I expected)...

The construction and sewing process was completely done on the fly.  I wouldn't call it terribly efficient--working from a pattern turned out to be easier.  But this was definitely faster.     

The end result?  A definite meh.  It's just okay.  I don't love it but do think some cute pockets would really help, so on they will go.  Someday.  The biggest hassle was the side sashing done without the benefit of a pattern.  Should I attempt this again, I'll just do a simple, continuous, sash at the waist and ties that attach to the top.  

But all in all, it is still a lot prettier than the other aprons currently hanging in the pantry.  Those were accumulated mostly by way of freebie promos, so you can imagine.  And I also keep reminding myself that it'll be covered in marinara sauce or brownie batter splatters within 24 hours.

I was happy to have a reason to test out my new tripod.  I will work on lighting next, promise.  Leo was absolutely fascinated with the auto shoot process.  And he couldn't resist sneaking in for a little smooch.  My goodness, does he ever have my heart in such a special way.  Leo is my love bug. 


Friday
Feb262010

Breakfast of champions.

We headed to a fun birthday party last weekend and I offered to make cake pops.  It was a rock-n-roll theme and I had grand plans to figure out a way to make guitar shaped pops.  Unfortunately, some sniffles and other small ailments that go with the current territory put an end to such lofty ambitions.  So I defaulted to our tried and true design of sprinkles and the celebratory birthday number.

I am getting pretty good at these, so much so that it was no problem to put them together a few hours before heading out the door.  Actually, the real reason the process went so quickly is that my mother-in-law brought me a lil dipper 1.5 quart crockpot when she last visited.  It's awesome!  It keeps the dipping chocolate melted and at the perfect temperature.  This means no more running back and forth to the microwave to zap and coax the coating into something workable.

The mom of the birthday boy sent the leftover pops home with us--claiming her family's sugar quota for the week was the remaining half sheet of birthday cake.  I put up a show of resistance.  But really, who am I kidding?  The boys were thrilled, as was I.  Whenever there are cake pops in the house, I have one for breakfast with my coffee every morning* until they are gone.  And yes, I hide in the pantry to do it.  I have one left.  It's out of reach for the under-seven set, way in the back of the fridge, on the top shelf.  I must admit that I feel a little guilty and selfish about my strategic storage.  But it's nothing a cake pop won't fix.  I hope you have something sweet in store for you this weekend, too--Happy Friday!


*And in other news that may or may not be related to this (as well as a recent delivery of many, many boxes of Girl Scout cookies)--I finally started training for the Marine Corps Half marathon.

Thursday
Feb252010

Bookmarked craft--ruffled scarf.

My list of 'must-try' craft tutorials bookmarked on my computer is getting ridiculous.  Let's just say that if I were going old-school with a paper pile, I'd get flattened if ever the stack should topple.  And because even virtual lists need some checkmark love, I've declared 2010 the year to tackle at least some of the crafts.  First up, an upcycled T-shirt to ruffled scarf I first saw on Vermillion Rules.

What I did:

I used the remainder of a white t-shirt (left over from the hoodie project) and cut it into 6 inch wide strips...

sewed them together, end to end, to make one long piece...

then sewed basting stitches (about an inch and a half in) on both edges.  I set the stitch length to the longest and upped the tension to create the ruffles...

I then set my sewing machine back to its normal settings and sewed down the ruffles--I did it on the front and back then removed the basting stitches. 

So easy, so quick.  And free!  Just enough trendy ruffles to add a feminine touch to my everyday uniform of a basic t-shirt and jeans.

*note to self--figure out a more inspiring place for self-photos.  Or--at the very least--clean the jammy handprints off the mirror before taking the photos. 


Sunday
Feb212010

UFOs*, done.

*UFOs=unfinished objects, but you probably knew that.

I finally found time to cross off some overdue projects from my to-sew list.  A few of them are donations for a silent auction that two friends are organizing to benefit cystic fibrosis research.  And I also put together some things for a friend to gift to a new baby in her extended family. 

The baby is named Maxwell and I made him a set of personalized burpers and a matching boutique-style chenille blanket.  I was not making these items when our Maxwell was a newborn so it was fun seeing his name stitched onto a set....

I also put together a set for the auction--I kept it blank and will do the personalization per the winning bidder's choice.  I tried to select a print that would work for either a baby boy or girl...

Next up was a 'mommy and me' apron set for the auction.  For the mommy version, I used Amy Butler's Domestic Goddess apron pattern.  Overall, I liked the pattern but felt that the bottom portion needed a lining (the pattern does not call for one).  I thought of this after-the-fact, so had to retrofit the lining--and it was a complete pain.  Next time, I'll cut out two body pieces and double up during the construction process. 

Below are some pictures.  Now, I mostly sew at night, after the kids are in bed, so I apologize for the poor lighting.  And also for my oh-so-casual posing I tried to pull off...though it does make me laugh.

I didn't have a pattern for the mommy's helper apron, so I just made it up as I went along, using whatever was left from the full apron. 

I lined it as well...

Surprisingly, I did not make one of the older boys model it.  Okay, I tried but it was a no go--they saw the bow and ran...so hard-wired, I swear.  It turns out it can also make a cute craft apron on a grownup...

I now plan to make myself some aprons, so in actuality I did not net much of a shorter to-sew list.  I cannot believe I've never made an apron before these.  They are so fun!  If you are a new sewer, aprons are a great place to start.  I'm not sure why I didn't thank of that way back when.  I think my first project when I was a newbie getting back into sewing was Max's nursery set, including a quilt, crib bumper, crib skirt, mattress sheets, changing cover, and full-length, fully lined, pleated curtains.  All done in pricey of-the-moment French toile yardage that made me vex and worry every time I cut into it.  Not recommended.

Wednesday
Feb172010

Gonna dress you up in my love.

I know it's a little forced here, but I've wanted to use an 80's Madonna song as a post title for quite some time.  And this isn't about what you may think.  There's no sewing going on.  It's just a little tidbit related to showing someone you care.  While also managing some OCD (but I'm sure that's just me).

I'm a big fan of saving half gallon containers to freeze my homemade broth in.  And I've also found they make the perfect container for homemade soup deliveries when a friend is feeling under the weather.  But whenever I've dropped off a container, it confuses the recipient for a half-second, as they wonder why on earth I'm delivering milk. 

And, truth be told, I'm a stickler for details.  So for the latest 'hope you feel better' basket, I grabbed a couple of plain brown paper bags...

cut off both bottoms (then cut those bottom into triangles); folded one bag in half, and scalloped its edges; and cut the other bag open...

then used double stick tape to wrap up the container...

I added a little door with a tiny note...

This took all of five minutes.  But now it looks much better nestled into a simple basket, filled with dry noodles (to add to the soup) and some natural VitC...

No more strange stares...works for me.  For more tips, check out Works For Me Wednesdays over at We are THAT Family.


Tuesday
Feb162010

Lil Blue Boo & Dharma Trading Co. design challenge, part 2.

I know the challenge is officially over, but I couldn't resist trying to get a few pictures of the hoodie in daylight.  And I was wrong when I said no one here could squeeze into the size I made--William could.  Technically.  But he wasn't happy about it.

One of the things I love most about Ashley's hoodie pattern is the use of contrasting pieces--it really ups the look but isn't hard at all.  And it is so versatile.  Plus, she gives you lots of hints on pattern placement to optimize reusing existing hems on the t-shirts you're upcyling.  This saves tons of time.


As I mentioned, I added a lining to the hoodie, using a star print I made with freezer paper stencils.  This technique is so addictive.  I did a lot (and I mean A LOT) of freezer stencil projects last year, but then put it away for a bit as I moved onto other things.  Doing it again really reminded me how great it is--I think that's exactly why I chose to try the challenge, to get the creative juices going.  Check out Ashley's tutorial on the process if you've never done it.

There are several ways you can line a hood.  But instead of hiding all the seams, I chose to showcase them in the lining.  Again, because I love the contrast as a design element.

The hood itself fits really well on the nognog.  When I cut it out, I thought I must have cut on the wrong line because it looked huge.  But take it from me, trust the pattern.

I will be sorting through the closets for more knits to upcycle.  Sir William wants one that fits.  Here he is  rushing the camera while trying to take off the hoodie by yanking straight up on the hood (reinforce those seams!).  It's his classic "we're done here" move.

I cannot wait to check out some of the entries.  And I'm the lookout for more challenges like this--not because I think I have a shot at the competition, please--it just really worked to motivate me.  And it's also nice to be a part of it.  Like a modern day sewing circle.

 ETA:  If you'd like to print out your own baby to-do list, I just added a pdf you can download on the original post.