Shop Duck Duck Wool

Where was that?
Updates

Enter your email address:

Delivered by FeedBurner

Look around
Pumpkins One, Two, and Three (and Me)

when I started the blog...

and a few years in...

and now...

3pumpkinslittle on Instagram 


Entries in sewing (27)

Thursday
Jan072010

Bucilla.

Right about now, during the clean up from massive merriment, I'm pretty much ready to put away the Christmas things until next year.  But there is one item that I usually keep out and move to my sewing room--Max's stocking. 

It is made from a Bucilla kit and it took me quite a bit of time to finish.  I absolutely adore it.  Once I finally hung it on the mantle, Charlie asked, "are you actually going to let Max touch it?"  Hmmmph.  Charlie had sat on the couch next to me for countless nights as I toiled away during TV time, so I guess it's not a silly question.  But of course Max is allowed to touch it.  Carefully.  And of course he'll eventually get it.  When he's married and has a wife who will take care of it. 

I don't put the stocking away for a few reasons.  One, it extends the season a bit, not too much, but just enough.  Also, I want to back it with something more substantial than the flimsy felt that came with the kit.  There is a better chance of this happening if it's out and about (though this strategy has yet to actually work).  And last, hopefully seeing it will motivate me to get going on Leo's stocking.  He has patiently waited and pretended to like his Target stocking just as much as Max's "fancy" stocking for the last two years.  It's pretty pitiful, actually, and he really deserves his own.  And of course there's also Will's.  And maybe, maybe, one for Charlie and myself.  But frankly ours are holding strong in the eventually column.

Have you ever seen a Bucilla kit?  My best friend from childhood got me hooked as she had one growing up, made by a crafty aunt.  And even then, when most high-school girls aren't too impressed by such things, I coveted it very much.  In case you're inclined to give it a go, here is a shot of Leo's kit.  It can be pretty daunting when you get this pile of...stuff...unless you know what you're getting into--and I remember searching the web for info about it with no luck a couple of years ago.

I also remember dumping out Max's kit and muttering something not too very Christmas-y.  *I know I mentioned I cursed during my recent Christmas quilt-a-thon, too, so I feel the need to point out that I actually hardly ever curse (married a Marine--he does it for me), but there are exceptions. 

The stockings I picked were designed for Bucilla by Mary Engelbreit, which surprised me.  Because although I do think her stuff is darling, it's usually not quite my style.  I'm fickle in that I like country stuff but only in certain ways and in little doses.  And it's really more cottage style that I like, think weathered wood, rustic...simple.  My mother sometimes tries to pick up things for me thinking I'll like it because it's "country" but I tell her, "no, that's country chicken and I don't like country chicken."  Unfortunately no one really understands what I'm trying to distinguish between so I sometimes end up with gifts with miniature feed sacks in them. 

Okay, back to little Ms. Mary.  Even though I typically don't go for her stuff, I absolutely flipped over the folksy feel of this kit.  With most Bucilla stockings, you do a lot of detail with sequins and beads.  But with the Engelbreit-designed kits, it's all in the stitching.  For instance, the very first bit of embellishment I did was on Santa's boot--two colors of thread twisted to make a candy-cane effect for his laces.  And all of the trim on Santa's coat was embroidered...in fact, just about everything is embroidered versus beaded.  Here is a close up of Santa's coat and boots...

and the snow-child's cap...

Oh, and let's not forget the cute dimensional work from the design--the snow-child in Santa's arms is a little stuffie you make then tuck into his arms...

Here is what Leo's stocking will (eventually) look like.  It's another Mary Engelbreit design--wish me luck!


Monday
Jan042010

A keepsake quilt.

I've wanted to make a special Christmas quilt for my mother-in-law for a very long time.  I actually bought the fabric for it when I was pregnant with Will two years ago.  Since she is a mother of all boys (and her two boys have all boys!), we have a lot in common.  Specifically, I know what it's like to live in a house where the majority of the occupants don't get all worked up by the nice linens and other whatnots that adorn their home.  It's a big deal when my MIL or I visit the other's house because when we haul out our pretty kitchen and bath towels, for once, someone else notices.  So I wanted to give her something pretty.

I also wanted to make her a quilt because, quite simply, it's hard to express just how grateful I am to the woman who gave me my husband, and in turn, my family.   

So this year, when a blizzard came to town the weekend before Christmas, I decided not to freak and fret over the snowed-in weekend and no-go errand runs.  Rather, I tallied up the suddenly free hours from two rescheduled Christmas parties and had a crazy thought.  While the older boys played outside until they were blue... 

I found my stash of fabrics...

and cut and sewed and ripped out stitches and cursed and sewed some more...

I decided on a crazy quilt because I didn't have time to plan any blocks.  Morgan's quilt for her newest little one, over on One More Moore, provided the inspiration for the design.  I just cut the fat quarters into 2 1/2 inch strips, then sewed three different strip patterns together.  I then cut the pieces into 6 1/2 inch square blocks and pieced them together, alternating their orientation.  I originally planned to make the quilt the size of a throw, but Charlie convinced me that that's basically a useless size for snuggling on the couch because throws can keep a full-sized man's upper or lower body warm, but not both.  Noted.  So, to increase the size, I added a border of white and made some blocks for the corners.  It was all done on the fly and I'm sorry that there are no pictures of that--sort of short on time as it was--but here is the finished quilt top.

I continued to de-stash by piecing two fabrics together for the backing and used some store-bought tape for the binding--which I sort of hate but whatever.  I almost went through the roof when I came up four inches short of completing the binding.  Seriously, four inches.  And in case it's not obvious, that is when the cursing occurred.

Luckily, after my in laws arrived on the 22nd, I was able to pop into Joanne's to pick up another pack of binding to covertly finish the quilt after everyone went to bed on Christmas Eve.

Here is a shot of the backing.  You can see that I just quilted in the ditch--practicing free-motion quilting is on this year's to-learn list as I have no idea how some of you do such a lovely job of it!  I used organic cotton batting and made sure to prewash my fabric, but not the batting, so that when I washed the completed quilt, it would get all wrinkly and yummy. 

In the corner, I placed a little poem that Charlie helped me write.  To print it on fabric, I ironed white cotton fabric onto freezer paper, then cut it down to 8 1/2 x 11 inches so it would feed into our ink jet printer.  I printed the wording directly onto the fabric and heat set it with my iron.  Before turning it into a patch for the back of the quilt, I prewashed it to check for color-fastness.  I was very happy to find it held up perfectly in the wash. 

My mother-in-law absolutely loved the quilt and I was so happy we could be with her the year we gave it to her!  This was the largest quilt I've made to date...before this attempt, I'd only made a handful of baby quilts.  But now I think I'd like to make quilts for the boys' beds.  And I fully intend to give myself more than a few days to do it!

ETA:  I'm linking up to Kimba's DIY day here.


ETA:  I'm linking up to Kimba's DIY day here.

Monday
Oct262009

If you wait until the last minute, it only takes a minute.


Back when I was practicing appellate law, a dear co-worker and I adopted the title of this post as an unofficial office slogan.  We were so busy that on any given day, we could only deal with the most urgent of deadlines.  I find myself in a similar boat these days.

Last year, Max was sick the entire week before Halloween.  It turned out to be bronchitis.  It was almost serious enough to keep him in for trick or treating, but luckily, he started feeling better and made it out.  I am 85% sure he was not faking it. 

He asked to be a wizard and I had every intention of finding a pattern and sewing a proper costume for him.  But caring for him that week was full-time, especially as we were constantly on guard, attempting to keep his brothers healthy (but of course Leo still got sick).

It was not until the night before Halloween that I found time to try to whip up a wizard costume (and no, the irony that I had to conjure up something was not lost on me).  I already had the fabric but no pattern.  Below is what I did and it worked well enough.  It is certainly not the best constructed garment I've ever made--in fact, it's probably one of the worst--but it was quick and easy and put a smile on my little one's face, a rare sight indeed that week.

In case you are in similar desperate straits (and I sure hope you're not), here is an extremely rudimentary guide to how I made a wizard frock in about 30 minutes.  Ours went over the head but you could also cut it up the front to make it more robe like.


I used a satin costuming fabric that was fairly difficult to work with, especially the neckline as it kept slipping (I double folded it).  To really save time, I recommend using a fabric that will not fray, such as fleece or jersey, so you wouldn't have to bother with hemming. 

As for Leo, he had told us for weeks that he wanted to be an astronaut and the plan was to use Max's costume from the previous year.  But the night before the harvest parade at his school, he decided he wanted to be a lion.  He really wanted to be a lion.

And I have a problem saying no. 

Again, I attempted this with no pattern--what is wrong with me??  I used a pair of his footed pajamas as a guide.  I'm sorry I can't diagram it because it was pretty nightmarish and I've blocked it from memory.  At least the parade was a few days before Halloween, so in my book, I was done "early."   I used fleece, which I love because it is so forgiving.

So after last year's stressfest getting their costumes done, you would think I learned my lesson and finished their costumes early this year, right?  Perhaps before we left for Disney?  Wrong.  Guess what I'll be doing after bedtime this week? 

I'm participating in A Soft Place to Land's DIY day.  Be sure to check out all the other projects--I always get so many ideas from there!


Tuesday
Sep082009

Icee cozie with a short how-to.


Although I bake treats nearly every day for my brood, do you know what works them into a tizzy without fail?  Icee pops.  Yes, the artificial flavored water you can always find at the dollar store.  I like to think it's because I don't let the boys eat them too often.  But honestly, it's probably because I went a little heavy on the flax in the most recent round of muffins.

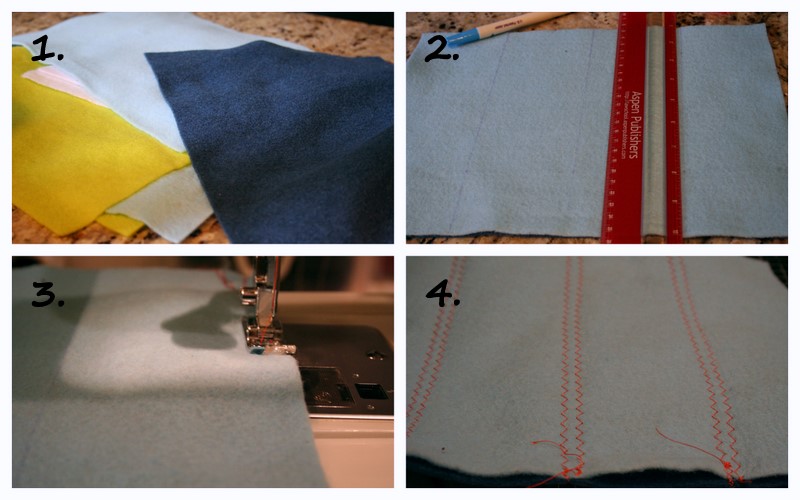
So.  They love icee pops but won't hold them because they are ICE and thus--yup--freezing.  Sick of paper towels constantly unwrapping (not to mention the waste because I finally switched the household to cloth napkins) I whipped up some cozies out of craft felt.  I made a dozen or so for our neighborhood Labor Day block party.  But then it started raining and the entire party moved indoors (as in our indoors) so I put the kibosh on the icee pops. 

I meant to make these all season but never got to it.  And I just should have done it because the cozies took all of 12 minutes to make.  Since summer is technically over (sniff), instead of looking at this as something I never got to, I'm going to spin it as "wow, I already crossed something off my summer craft list for next year." 

 1.  Find some spare felt.  I have a ton of acrylic felt laying around because I'm hooked on using wool felt for most of our crafts.

2.  Determine how wide to make the cozies.  There are wide and skinny icees--go figure.  We have somehow acquired both so I marked accordingly.  You certainly could just wing this but I knew I'd forget to make different widths.  I swear my short-term memory has still not recovered from my pregnancies.

3.  Sew.  I used a bright colored thread in a wide zig zag for contrast.  That is as fancy as I got.

4.  You need two rows of stitches on the inside lines because you will cut between them (see below).  

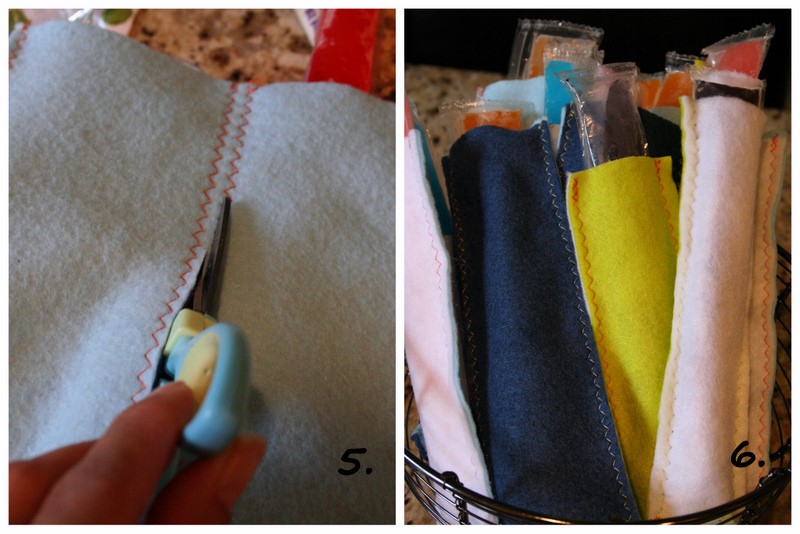
5.  Cut your cozies apart.  Up to you whether to stitch the bottoms closed (I did).

6.  Put the icees into the cozies...now they are ready for little fingers.

Monday
Aug312009

More t-shirt embellishing.

Our oldest, Max, started first grade a few weeks ago.  And according to him, it's much different than kindergarten.  Every day when he gets home, he tells me it is really, really hard--the reading, the writing workshops, the lack of snack time, so on.  Max generally handles whatever is thrown his way, so I'm surprised to see his new routine wipe him out each day.  Often, he collapses and curls up on the couch for a few minutes as I get his snack ready.  He always asks for one thing as he decompresses--his stuffed dog, Clifford.  Clifford joined our family when Max was a baby and it quickly became his lovie.  And although Max is in a proud "I'm a big boy, not a baby!" stage, he has not outgrown Clifford.  He even gave Clifford a family--two baby Clifford children and another stuffed puppy for a wife.  Here is a picture Clifford "took" of Max and Clifford's family after Clifford's wedding.  Yes, there were invitations.  And yes, I did the flowers.


Max's kindergarten teacher let the kids bring in special items to make the transition easier, so it was not uncommon for Clifford to hitch a ride to school in Max's backpack.  But so far, there has not been an opportunity for Clifford to check out first grade.  And I can assure you that Max is not going to suggest it because he thinks you don't do such a thing in first grade.

So, I took a red t-shirt that I picked up because I liked its weathered, washed finish, and machine stitched a familiar image onto it.  This way, Max can at least take Clifford's likeness to school on any day he should want his faithful friend by his side.  It makes us both smile.

I used my phone-book paper method, so see my previous post for a full tutorial.  But in a nutshell, I traced Clifford's outline onto a sheet of phone-book paper.  I pinned my paper onto the t-shirt, which was reinforced with some lightweight adhesive stabilizer underneath (because the fabric was super stretchy).  I machine stitched a straight line (using a short stitch to perforate the paper) following my tracing.  I ripped off the paper and then went back over the stitches with a tight zig-zag (I found if I zig-zagged directly onto the paper, it caught too much paper within the stitches).  I used black fabric paint to fill in Clifford's eyes and collar.  And as I post this picture, I see that I forgot to fill in his nose so off I go to remedy that.   

Wednesday
Aug262009

Tutorial: Reverse applique using recycled phone book pages.


I'm a big fan of reverse applique--it's so fast and easy.  Usually I trace an image onto my outer fabric using a water-soluble pen, but when I'm altering a dark fabric, it's hard to see any markings.  So on dark fabrics, I usually make a paper template of the image, pin it to the outer fabric, and stitch around it.  But sometimes that doesn't work too well--it can be hard to negotiate around fairly intricate shapes even if you do pin down all the edges.

Last week, Leo and I decided to embellish some plain tees and we didn't get around to making them until the very end of Will's nap.  Trying to save time, I decided to just stitch right onto my printed image (rather than cutting it out beforehand) then rip away the paper--sort of like paper piecing on a temporary foundation if you've ever done that in quilting.  My first attempt was okay, but I used plain computer paper and discovered it was too thick, leaving too many bits of paper caught in the stitches. 

So, on my hunt to find a thinner paper (but not use up my precious tear-away stabilizer stash), I came across an old phonebook destined for the recycling bin.

Pages from it worked great--the paper tore away nice and clean.  But there are a few things to note.  I keep a needle set aside to use on paper only.  Sewing through paper really dulls a needle, so although I know you should use a ball-point needle on knits, I end up using whatever my "paper" needle is at the time (I'm usually altering what would otherwise be donated, stained tees, so I don't fuss around too much and just dive in).  Make sure to use a fairly short stitch as it will help to perforate the paper, making it tear away easily.  Also, I rubbed my finger on the phonebook page to make sure that the ink wouldn't rub off like crazy.  It didn't.  But still, this might not be the best medium to use if altering a light colored garment.

You will need:

Clothing to alter

Desired image traced onto thin paper like phone book pages

Contrast scrap of fabric larger than your image

Straight pins

Sewing machine

For inspiration, I usually do a Google image search for whatever it is that the boys would like on their shirt.  I then hand draw it onto the paper.  You could also trace it over a light box but since I don't have one, I am often found tracing against a window.  This time I traced a puzzle piece.


Be sure to use a color you can easily see.  I do not have a see-through sewing foot so I like to trace my image in bright red.   

 Pick out your contrast fabric and decide on where you want to place your applique. I often like to center them, but if it's your first time, you might want to pick an off-center spot so you don't have to worry about precise placement--a lower front corner always looks nice.    

Place your contrast fabric, right side up, beneath your desired applique spot.  Place your paper template on top, makiing sure the contrast fabric is beneath all of your traced lines.  Pin, catching all three layers:  your paper, the garment, and the contrast fabric.

Set a short stitch length on your machine to really perforate the paper to make it tear away easily.  Stitch directly onto your 'sandwich' following the outline of your image, removing pins as necessary.  Don't forget to backstitch at the start and finish.

Gently tear the paper, pulling away from the stitches, not across.    

Using small detail scissors, carefully cut away the top fabric to reveal the contrast fabric.  Cut close to the stitched line but you want to leave a little bit of the top fabric so your stitches don't pull through.

Your edges will look a little imperfect until you launder the garment.  After washing it, the knit fabric will curl back for a nice effect.

Trim the contrast fabric from the back.  I like to use pinking shears. 

Now give it to the patiently waiting munchkin to wear! Oh, and we did a rocket too.

Have fun!


Wednesday
Aug192009

A little sewing.


I'm not the best seamstress in the world and I'm not the worst.  I'd place my sewing skills squarely in the middle--not a novice at all but by no means an expert.  I am self-taught and have found that I'm pretty good at figuring things out.  And I'm loving this current bloggy craft movement where you can find a tutorial online for just about anything.  There are so many projects I want to try!

But last week I didn't attempt anything new.  I made some embellished burpers and a minky blanket for friends to give as gifts to new babies in their families.  I sometimes sell these on Etsy in my "shop" but I haven't listed anything in forever.  Maybe someday....


The burpers are just embellished with quilting cotton and ribbon at the bottom and I add a handcut applique over the machine-embroidered name (I have a small embroidery sewing machine which is fun).  The blanket is so snuggly.  I use super plush dot minky on one side and coordinating quilting cotton on the other.  I have yet to figure out the trick to working with minky!!!  It slips so much--and I even use a walking foot.  It always ends up a bit wonky but I think I'm the only one who can tell.  Please pass along any tips if you have them. 

I hope to do more sewing as the school year picks up.  It's one of my favorite things to do during any down time.  But right now, after the boys are in bed, I am tackling rooms and closets in the house on an organizing mission.  The older boys pretty much wrecked any systems I had in place before summer.  I love that they are getting to be so independent in getting out toys and craft supplies, but sheesh!  It comes at a price.  A messy, stacked-bins-defying-gravity price.  I am saving my craft room for last because it is the room that needs the most work--I let them loose in there to make some cards and now there are bits of this and that everywhere.  I plan to post "after" pictures.  And if I can stomach showing its current blitzed state, I'll even post "before" pictures...but I wouldn't count on it!


Page 1 2 3