Shop Duck Duck Wool

Where was that?
Updates

Enter your email address:

Delivered by FeedBurner

Look around
Pumpkins One, Two, and Three (and Me)

when I started the blog...

and a few years in...

and now...

3pumpkinslittle on Instagram 


Entries in tutorials (15)

Wednesday
Oct072009

Halloween treat bag tutorial.

I was in the craft store a few days ago and saw a kit from Martha's line for cute favor bags.  They were designed to look like witch brooms and I thought they were adorable.  But I didn't want to spend any money on them since I knew I could do the same thing with items I already had at home.

Here's what you will need (per treat bag) if you'd like to make some, too:

  • 2 brown paper bags
  • straight edge
  • exacto knife and cutting surface
  • twine
  • twig*

Directions:  

Flatten one of the bags.  The picture below isn't the best because I didn't take one with the sides smoothed out.  Basically, you want two layers to cut through so push out the sides and flatten.

Leaving about a two inch border of the bag uncut at the top and bottom, cut lines through both layers in the center portion.  No need to be too exact, it's a witch's broom after all. 

Place your goodies in the uncut bag and place within the cut bag. 

Shmoosh down a bit and gather both bags at the top.  Insert your twig* and tie with twine. 

I think these will be perfect to package our Halloween cutout cookies this year.  I'll use the sugar cookie recipe and frosting technique I posted about here.
*If I were making these for children, I'd probably use a pretzel rod in lieu of a twig (maybe a cellophane wrapped chocolate-dipped pretzel rod, hmm...).  Generally speaking, I'm against equipping children with a pointy, small, stick.  Especially when they're in a group.  And sugar is in their near future.  I'm just saying...
Wednesday
Sep302009

Stick 'em up.


The other day, I was over at a friend's house for a playdate and I noticed that she had labeled many household items to encourage her budding reader.  It reminded me of a couple of years ago when Max started reading and our house was also covered in tape and index cards.  But as I began taping up cards for Leo, littlest pumpkin Will followed behind me, collecting the cards as fast as I could put them up.  Or worse, he would move them and I wouldn't notice until I heard Max saying, "mom, why is the 'door' labeled 'potty'?" 

I needed a new plan.  I didn't love the index cards anyways--with three boys, you can probably guess how yucked up they got.  But unless you also have three boys--and incidentally, if you do, could we please start a group or something?--you probably don't know how fast they got yucked up.  Well, it's fast.  Like, by dinnertime the day I put them up fast.  And I also didn't like how messy they all looked, flapping about.  But that's probably just at my house due to the constant wind tunnel from the racing track an open floor plan apparently encourages.  Don't get me started.

In a perfect world, I wanted to print on something because my hand writing would in no way encourage reading--squinting, yes; reading, no.  I also wanted labels that would stay up, be wipeable, removable, and repositionable.  Yes, I ask for a lot.  I had some vinyl and tried to print on it, but four paper jams later I discovered that the ink never completely dries on it.  Smear city was less than ideal.

Eventually, I did just hand write the words, but I traced a nice font.  I then topped it with more vinyl for extra durability.  I trimmed them down and played a game with the older boys:  they drew a label, had to read it, then stuck them up. 

They stick everywhere and stay put, even on a porcelain sink.  And yet they are removeable without any residue.  And you can wipe right over them.  And if a little munchkin happens to pull them up, they go right back as they are repositionable.  Nice.

Supplies

  • Clear/transparent vinyl (I used clear Con-Tact paper)
  • Print-out of words in an easy-to-read font (unless you have nice penmanship, in which case I'm jealous)
  • Permanent marker/paint marker in dark and light (use the light color for labels for dark furniture)
  • Scissors

Directions

Decide what items you want to label and print out your words. 

Top your word sheet with your vinyl, leaving the backing on, and trace your words, using a dark or light marker.

Top you labels with another sheet of vinyl.

I like to trim close to the lettering to make the label less obvious.  Peel the backing and label away!

I also like to use the labels to encourage sorting, e.g. clothing labels for drawers or toy labels on bins.  And for our youngest, I draw pictures instead of words.  Let me know if you give it a go.

Tuesday
Sep082009

Icee cozie with a short how-to.


Although I bake treats nearly every day for my brood, do you know what works them into a tizzy without fail?  Icee pops.  Yes, the artificial flavored water you can always find at the dollar store.  I like to think it's because I don't let the boys eat them too often.  But honestly, it's probably because I went a little heavy on the flax in the most recent round of muffins.

So.  They love icee pops but won't hold them because they are ICE and thus--yup--freezing.  Sick of paper towels constantly unwrapping (not to mention the waste because I finally switched the household to cloth napkins) I whipped up some cozies out of craft felt.  I made a dozen or so for our neighborhood Labor Day block party.  But then it started raining and the entire party moved indoors (as in our indoors) so I put the kibosh on the icee pops. 

I meant to make these all season but never got to it.  And I just should have done it because the cozies took all of 12 minutes to make.  Since summer is technically over (sniff), instead of looking at this as something I never got to, I'm going to spin it as "wow, I already crossed something off my summer craft list for next year." 

 1.  Find some spare felt.  I have a ton of acrylic felt laying around because I'm hooked on using wool felt for most of our crafts.

2.  Determine how wide to make the cozies.  There are wide and skinny icees--go figure.  We have somehow acquired both so I marked accordingly.  You certainly could just wing this but I knew I'd forget to make different widths.  I swear my short-term memory has still not recovered from my pregnancies.

3.  Sew.  I used a bright colored thread in a wide zig zag for contrast.  That is as fancy as I got.

4.  You need two rows of stitches on the inside lines because you will cut between them (see below).  

5.  Cut your cozies apart.  Up to you whether to stitch the bottoms closed (I did).

6.  Put the icees into the cozies...now they are ready for little fingers.

Monday
Aug312009

More t-shirt embellishing.

Our oldest, Max, started first grade a few weeks ago.  And according to him, it's much different than kindergarten.  Every day when he gets home, he tells me it is really, really hard--the reading, the writing workshops, the lack of snack time, so on.  Max generally handles whatever is thrown his way, so I'm surprised to see his new routine wipe him out each day.  Often, he collapses and curls up on the couch for a few minutes as I get his snack ready.  He always asks for one thing as he decompresses--his stuffed dog, Clifford.  Clifford joined our family when Max was a baby and it quickly became his lovie.  And although Max is in a proud "I'm a big boy, not a baby!" stage, he has not outgrown Clifford.  He even gave Clifford a family--two baby Clifford children and another stuffed puppy for a wife.  Here is a picture Clifford "took" of Max and Clifford's family after Clifford's wedding.  Yes, there were invitations.  And yes, I did the flowers.


Max's kindergarten teacher let the kids bring in special items to make the transition easier, so it was not uncommon for Clifford to hitch a ride to school in Max's backpack.  But so far, there has not been an opportunity for Clifford to check out first grade.  And I can assure you that Max is not going to suggest it because he thinks you don't do such a thing in first grade.

So, I took a red t-shirt that I picked up because I liked its weathered, washed finish, and machine stitched a familiar image onto it.  This way, Max can at least take Clifford's likeness to school on any day he should want his faithful friend by his side.  It makes us both smile.

I used my phone-book paper method, so see my previous post for a full tutorial.  But in a nutshell, I traced Clifford's outline onto a sheet of phone-book paper.  I pinned my paper onto the t-shirt, which was reinforced with some lightweight adhesive stabilizer underneath (because the fabric was super stretchy).  I machine stitched a straight line (using a short stitch to perforate the paper) following my tracing.  I ripped off the paper and then went back over the stitches with a tight zig-zag (I found if I zig-zagged directly onto the paper, it caught too much paper within the stitches).  I used black fabric paint to fill in Clifford's eyes and collar.  And as I post this picture, I see that I forgot to fill in his nose so off I go to remedy that.   

Wednesday
Aug262009

Tutorial: Reverse applique using recycled phone book pages.


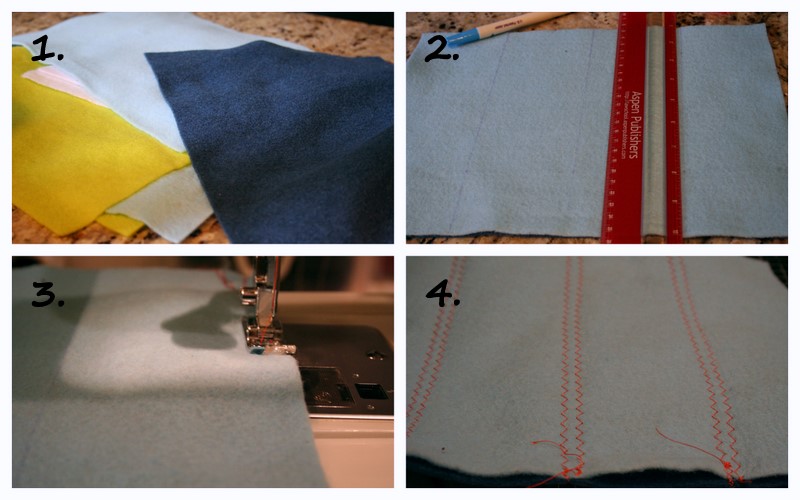
I'm a big fan of reverse applique--it's so fast and easy.  Usually I trace an image onto my outer fabric using a water-soluble pen, but when I'm altering a dark fabric, it's hard to see any markings.  So on dark fabrics, I usually make a paper template of the image, pin it to the outer fabric, and stitch around it.  But sometimes that doesn't work too well--it can be hard to negotiate around fairly intricate shapes even if you do pin down all the edges.

Last week, Leo and I decided to embellish some plain tees and we didn't get around to making them until the very end of Will's nap.  Trying to save time, I decided to just stitch right onto my printed image (rather than cutting it out beforehand) then rip away the paper--sort of like paper piecing on a temporary foundation if you've ever done that in quilting.  My first attempt was okay, but I used plain computer paper and discovered it was too thick, leaving too many bits of paper caught in the stitches. 

So, on my hunt to find a thinner paper (but not use up my precious tear-away stabilizer stash), I came across an old phonebook destined for the recycling bin.

Pages from it worked great--the paper tore away nice and clean.  But there are a few things to note.  I keep a needle set aside to use on paper only.  Sewing through paper really dulls a needle, so although I know you should use a ball-point needle on knits, I end up using whatever my "paper" needle is at the time (I'm usually altering what would otherwise be donated, stained tees, so I don't fuss around too much and just dive in).  Make sure to use a fairly short stitch as it will help to perforate the paper, making it tear away easily.  Also, I rubbed my finger on the phonebook page to make sure that the ink wouldn't rub off like crazy.  It didn't.  But still, this might not be the best medium to use if altering a light colored garment.

You will need:

Clothing to alter

Desired image traced onto thin paper like phone book pages

Contrast scrap of fabric larger than your image

Straight pins

Sewing machine

For inspiration, I usually do a Google image search for whatever it is that the boys would like on their shirt.  I then hand draw it onto the paper.  You could also trace it over a light box but since I don't have one, I am often found tracing against a window.  This time I traced a puzzle piece.


Be sure to use a color you can easily see.  I do not have a see-through sewing foot so I like to trace my image in bright red.   

 Pick out your contrast fabric and decide on where you want to place your applique. I often like to center them, but if it's your first time, you might want to pick an off-center spot so you don't have to worry about precise placement--a lower front corner always looks nice.    

Place your contrast fabric, right side up, beneath your desired applique spot.  Place your paper template on top, makiing sure the contrast fabric is beneath all of your traced lines.  Pin, catching all three layers:  your paper, the garment, and the contrast fabric.

Set a short stitch length on your machine to really perforate the paper to make it tear away easily.  Stitch directly onto your 'sandwich' following the outline of your image, removing pins as necessary.  Don't forget to backstitch at the start and finish.

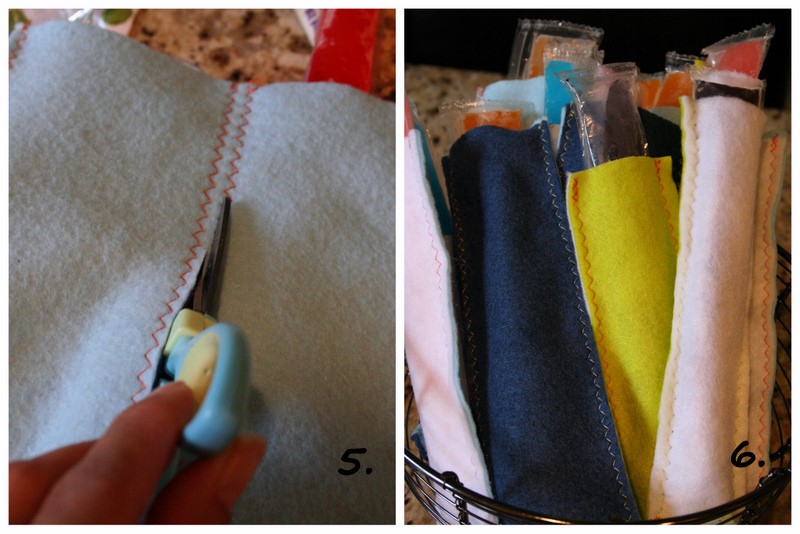
Gently tear the paper, pulling away from the stitches, not across.    

Using small detail scissors, carefully cut away the top fabric to reveal the contrast fabric.  Cut close to the stitched line but you want to leave a little bit of the top fabric so your stitches don't pull through.

Your edges will look a little imperfect until you launder the garment.  After washing it, the knit fabric will curl back for a nice effect.

Trim the contrast fabric from the back.  I like to use pinking shears. 

Now give it to the patiently waiting munchkin to wear! Oh, and we did a rocket too.

Have fun!


Page 1 2